
Pretty Bwoy Sunset Orange Wrap Kit on My Sur-Ron: Install, Fit, and Real-World Impressions
January 2, 2022
Some links in this article may be affiliate links. If you buy through them, we may earn a small commission at no extra cost to you.
I’ve been riding my Sur-Ron in the all-black factory look for a while, and it was time to add some personality. Not just for aesthetics, either—where I ride, being more visible in traffic is a genuine safety win.
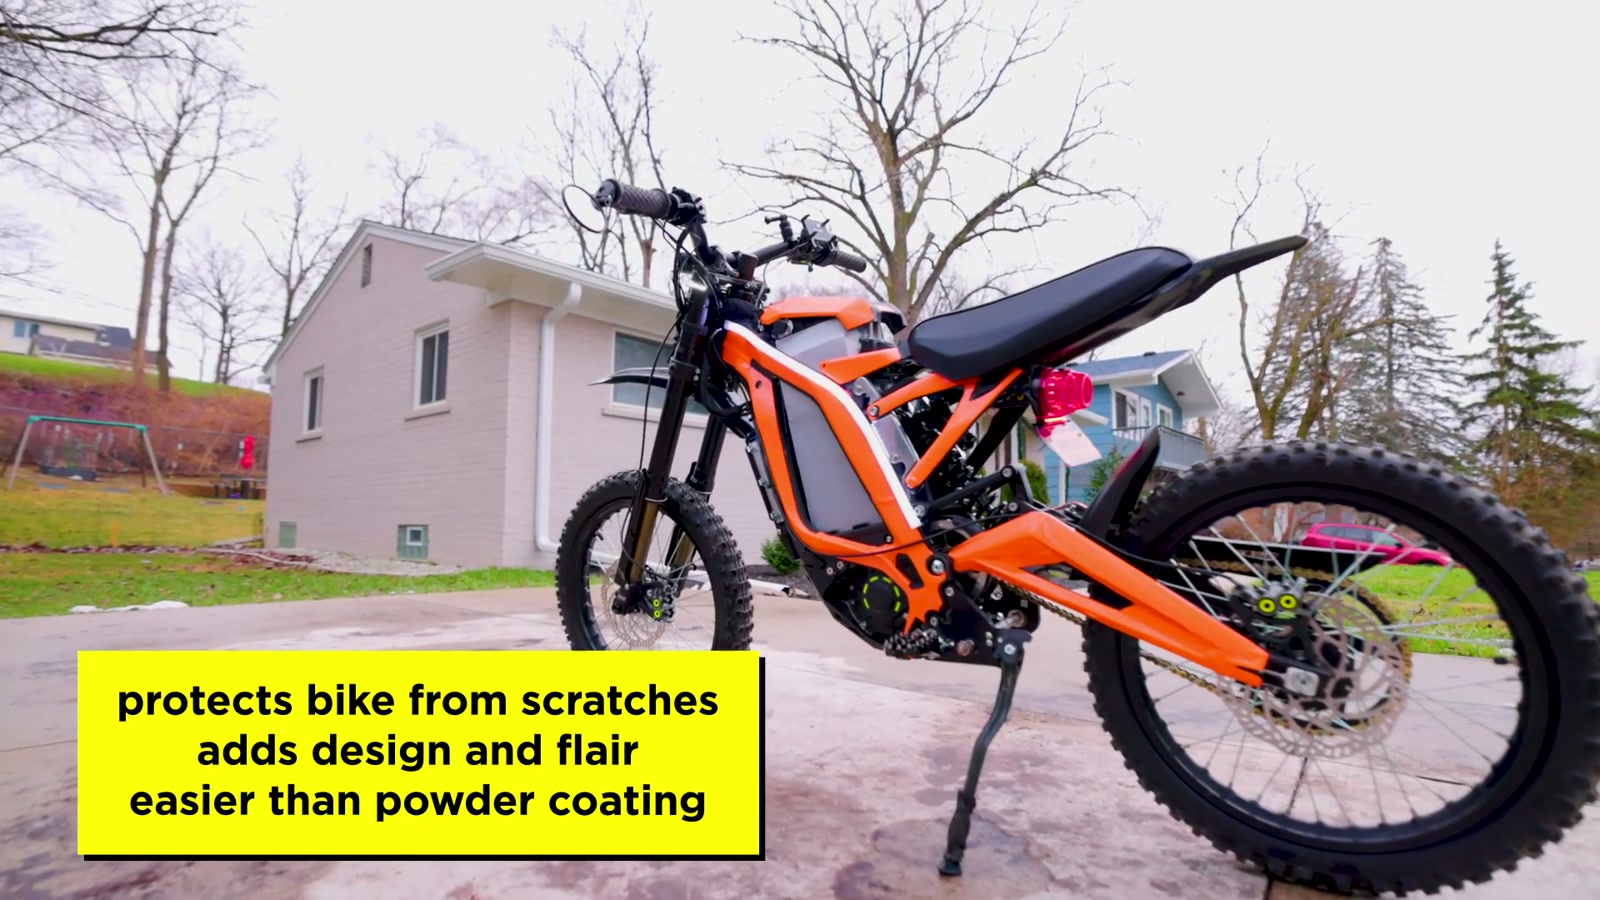
So I went with a custom-cut wrap kit from Pretty Bwoy (UK-based), in Malibu Sunset Gloss Orange. It’s the kind of loud, warm orange that pops in daylight and looks right at home next to moto gear.
Here’s how the install went, what I learned, and how it changed the vibe of the bike once it was back on the street.
Why I wrapped my Sur-Ron
The Sur-Ron’s stock black is clean, but it’s also… everyone’s Sur-Ron. A wrap was the easiest way to get a unique colorway without committing to paint.
The other big reason: visibility. In my city, standing out tends to be a positive. If you ride somewhere that staying low-key matters, you might feel the opposite—bright colors can attract attention.
As for protection: wraps help with minor scuffs and small scratches, but I wouldn’t treat vinyl like a suit of armor. For me, this was primarily about looks and presence.
Unboxing and what you actually get
The best part of a kit like this is that it’s already custom cut. My first thought was to buy raw vinyl, measure everything, and cut it myself—but the Sur-Ron frame has aggressive lines, edges, and curves everywhere. That DIY route can turn into a time sink fast.
With the Pretty Bwoy kit, I had a diagram to identify pieces and a set of panels meant for the major areas:
Side frame sections
Swingarm pieces
Seat/battery area pieces
Motor mount and rear tail area pieces
Front number plate area pieces
Additional sections (like fenders/fork areas depending on how fully you want to wrap)
Even if you don’t end up using every piece, having everything pre-shaped makes the whole project feel achievable.
Prep: what I did before sticking anything on
Before laying vinyl, I cleaned the bike to get rid of dust, dirt, and any oily residue. Vinyl is unforgiving about contamination—if the surface isn’t clean, edges won’t stay down and bubbles get harder to work out.
Tools-wise, I used:
A heat gun (essential for shaping around curves)
A squeegee (for smoothing and pushing air out)
If you’ve never wrapped anything before, don’t skip the heat gun. It’s the difference between “kind of fits” and “actually conforms.”
Installation: the reality of applying vinyl to a Sur-Ron
The Sur-Ron is a tricky platform for wrap because so much of it is angular and sculpted. That said, the kit made alignment pretty straightforward once I slowed down and worked panel by panel.
The basic flow that worked for me:
1. Dry-fit each piece so I understood orientation
2. Start with clean alignment on a key edge
3. Squeegee from the center outward to avoid trapping air
4. Use heat to soften the vinyl and mold it over contours
5. Re-check edges and press them down after the vinyl cools
Overall, the install felt manageable, but it’s not “perfect-on-your-first-try” territory—especially if it’s been a while since you’ve applied graphics.
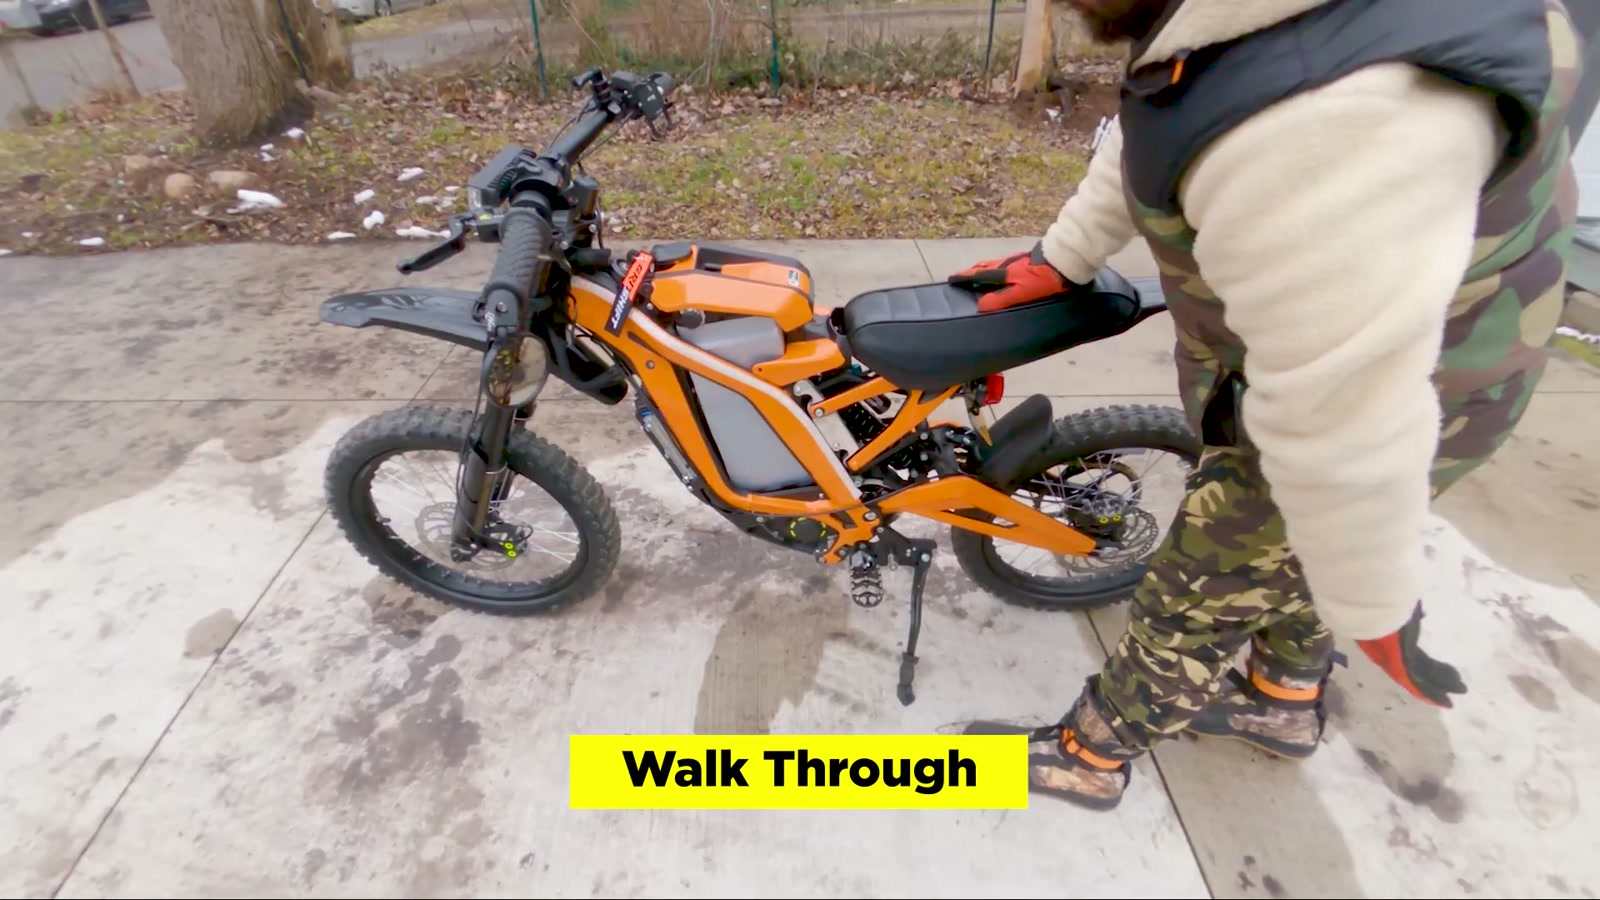
How it turned out (and what I changed)
From a normal standing distance, the finish looks really good. The orange transforms the bike from stealthy to custom immediately.
Up close, like most DIY wraps, you can tell it’s hand-applied. That’s not a knock on the kit—it’s just the nature of vinyl on a complex frame. If you want a truly flawless finish, a local wrap shop will almost certainly do a cleaner job.
I also made a couple personal choices:
I didn’t use every piece
I left off:
Front fender wrap
Rear fender wrap
Fork wrap
That was partly preference and partly practicality. Some areas take more abuse, and I wasn’t trying to overcomplicate the project just to say I wrapped 100% of the bike.
I used extra vinyl to fill “negative space”
Even with a full kit, there can be visual gaps where black shows through between sections. I used leftover vinyl strips to connect some areas and make the overall look feel more seamless.
I repositioned my side signal light
I didn’t want the signal placement breaking up the graphic where it sat originally, so I moved it slightly higher along the top edge of the frame.
The result is cleaner visually, and the amber signal actually plays really nicely with the orange wrap—more cohesive than I expected.
Battery look: brushed steel contrast
Instead of orange on the battery, I wrapped it in a brushed steel vinyl (a look I’m already familiar with from past projects). It adds a little extra surface protection and creates a sharp contrast against the orange and black.
Orange + black already works.
Orange + black + silver gives it that “intentional build” feel.
Real-world riding impressions: does it change anything?
No performance changes, obviously—but the riding experience still shifts because your bike’s presence changes.
In traffic, the bike feels more noticeable, which I personally like.
Parked or rolling slowly, the wrap gives it that custom build identity instead of blending in as “another black Sur-Ron.”
The gloss orange reads loud without looking cheap, which was my biggest worry going in.
It’s one of those mods that makes you want to ride more, purely because the bike feels refreshed.
Cost and value: wraps aren’t automatically “cheap”
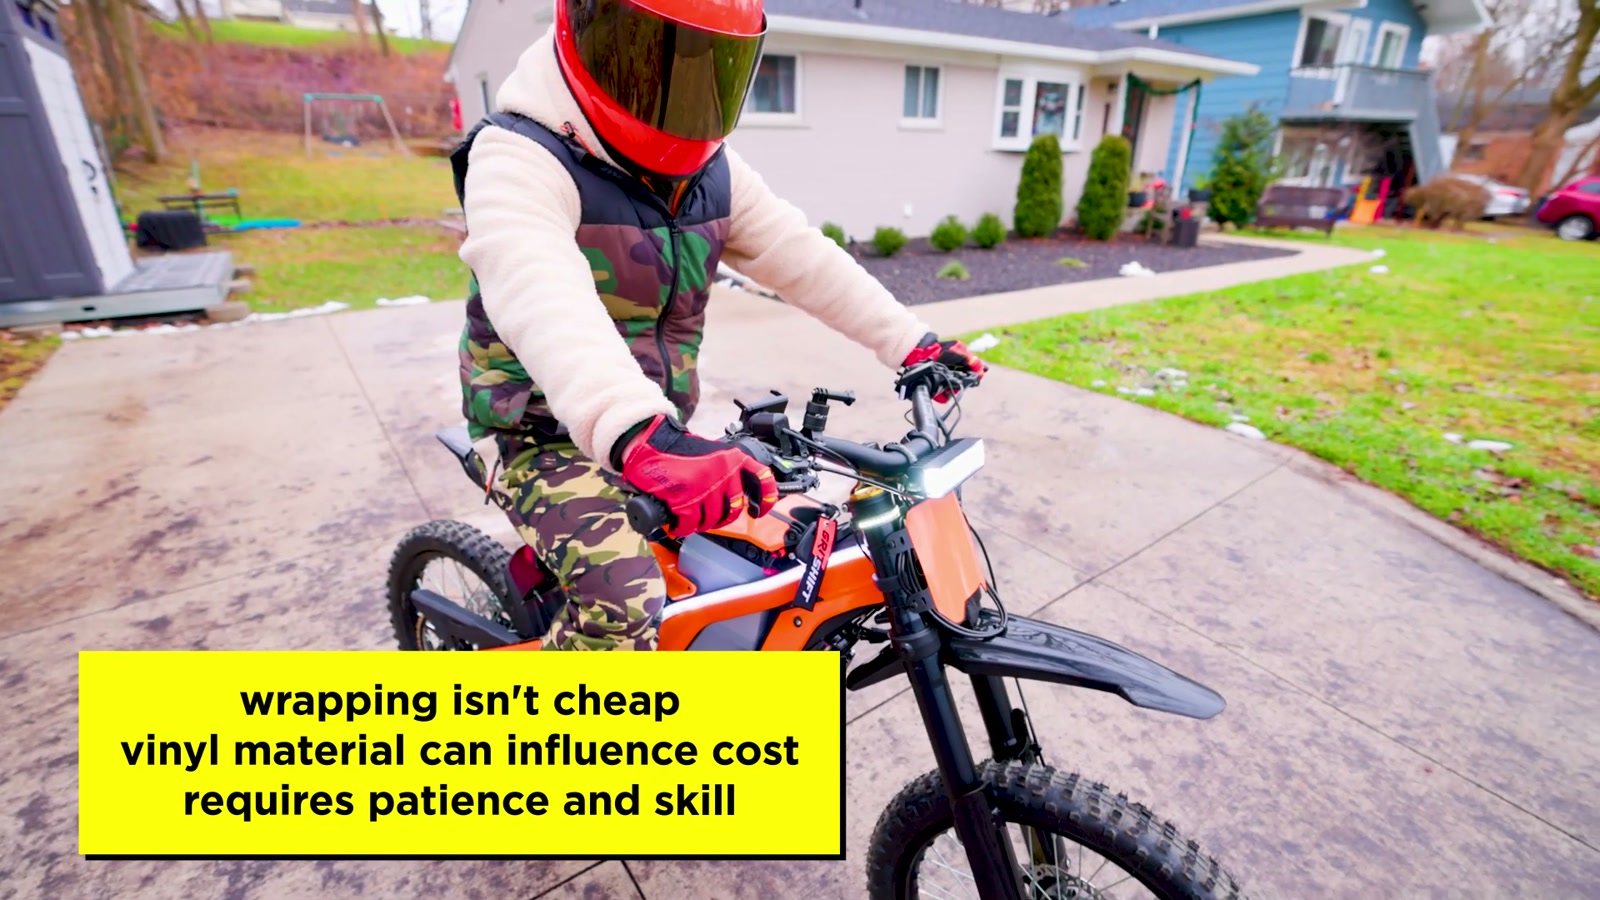
A lot of people assume vinyl wrapping is the budget option. Compared to paint, it usually is—but that doesn’t mean it’s cheap.
Custom cutting, material choice, and complex frame shapes all drive cost. And if you pay a shop to install it, that can easily become the biggest line item.
For me, the kit hit the sweet spot: faster and less expensive than painting, with a huge visual payoff.

What We Like
Completely changes the Sur-Ron’s personality from stock black to custom
Bright color increases visibility in traffic (huge for city riding)
Custom-cut kit makes a complex wrap job actually doable at home
Heat + squeegee method works well on the frame once you get into a rhythm
Pretty Bwoy was responsive and helpful, especially if you’re chasing a specific color
Things To Consider
A Sur-Ron wrap is not a “throw it on in 20 minutes” project—plan for real install time
DIY results can look great from a distance, but perfection up close usually requires a pro shop
Vinyl offers some protection, but don’t expect it to prevent real damage from hard hits or deep scrapes
Being more visible is a benefit in some places and a drawback in others
You may not want (or need) to wrap every single piece—pick what makes sense for your riding
Final Thoughts
If you’re bored of the factory black Sur-Ron look and want a mod that makes the bike feel brand new, this Pretty Bwoy Malibu Sunset Gloss Orange kit delivers. The color pops, the overall fit is solid, and the end result looks custom in a way that’s hard to achieve without paint.
I’d recommend it to anyone who wants a fresh colorway, better street visibility, and a build that feels more personal—just go in knowing that vinyl wrapping a Sur-Ron takes patience, and “good” is easy, while “perfect” is a professional install.