
DIY Tactical MOLLE Panel for the Super73 Z1: More Storage, Cleaner Carry
March 5, 2021
Some links in this article may be affiliate links. If you buy through them, we may earn a small commission at no extra cost to you.
If you ride a Super73 Z1, you already know the frame has a ton of wasted real estate. The open center section looks cool, but it’s basically a giant empty space begging to carry something.
Read more: Want a discount on your Super73? Use my promo code here and Option B (short fit) - 29" x 12" ABS Plastic
So I built my own DIY tactical MOLLE panel for the Z1—cheap, tough, and honestly one of the most useful little “why didn’t I do this sooner?” upgrades I’ve added.
MOLLE (Modular Lightweight Load-carrying Equipment) is just a grid system that lets you weave on pouches, tool bags, straps, and other accessories that use MOLLE-style webbing. The Z1 frame is a perfect host for that because it’s wide open and already shaped like a mounting bay.
Why I Wanted a MOLLE Panel on the Z1
I wanted daily-ride storage that:
Keeps gear centered and low (instead of swinging on a backpack)
Looks intentional (not a bunch of random clamps and bungees)
Doesn’t interfere with pedaling
Lets me reconfigure bags depending on the ride
A MOLLE panel checks all those boxes. Once the panel is in, I can swap pouches for a lock, a small tool kit, a battery bank, snacks—whatever I’m actually carrying that day.
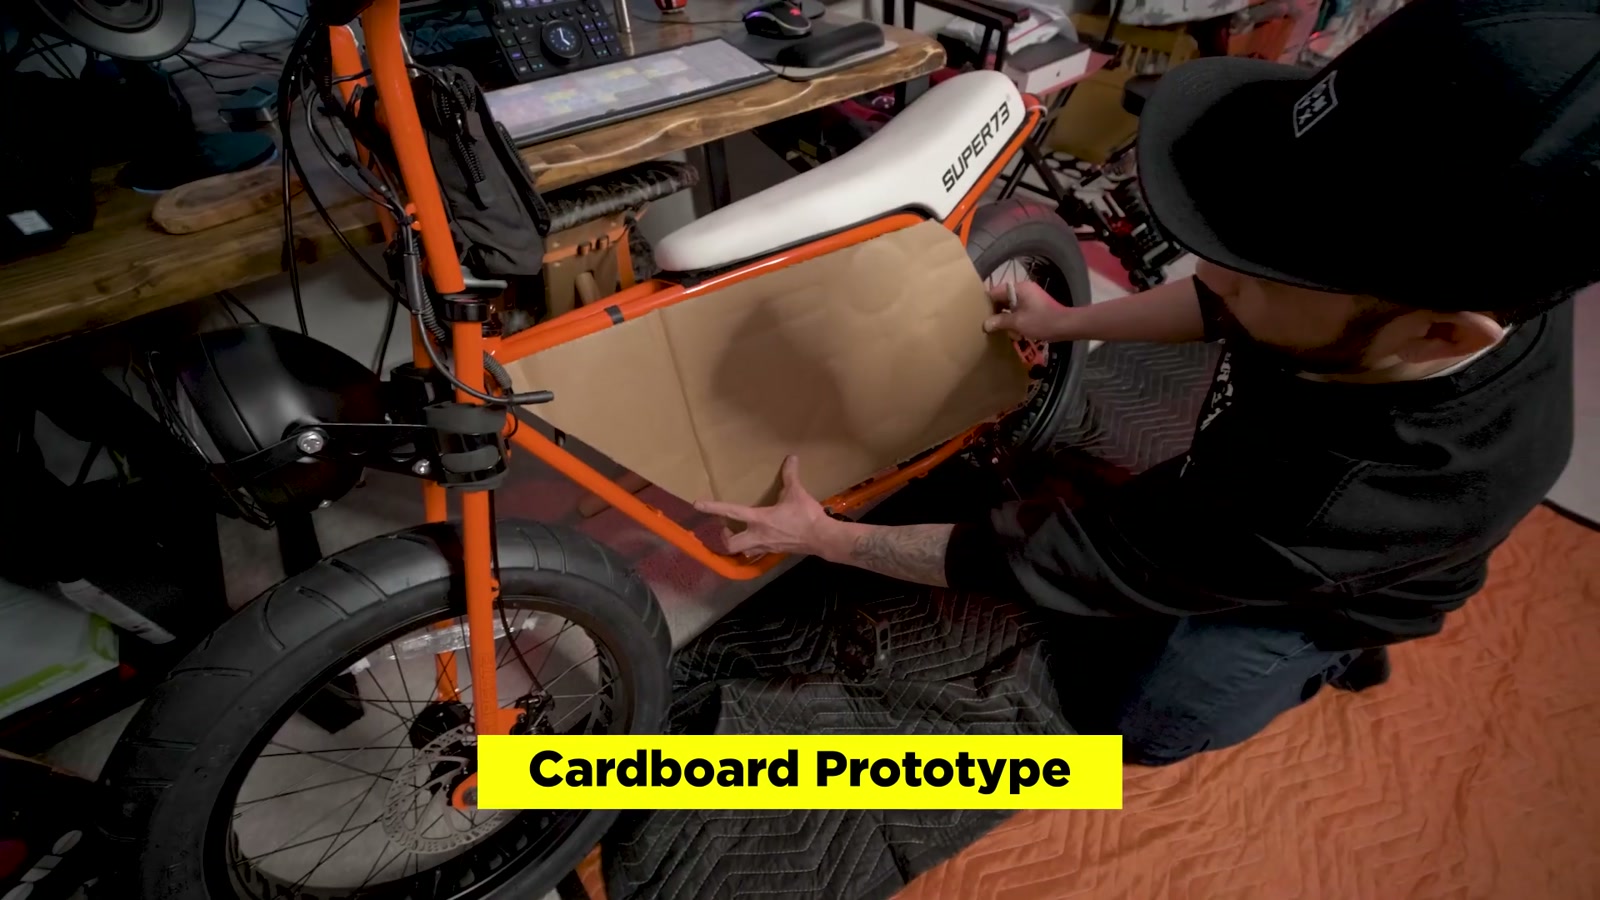
The Basic Approach (Cardboard → Template → ABS)
I started by prototyping the shape with cardboard so I could get something that fits snug inside the Z1 frame triangle. Once the cardboard fit looked right, I used it as the basis for a printable template.
One detail that matters: a “best fit” panel height lands around 13.5 inches tall at 29 inches wide, which usually means getting a local plastics shop to cut it. If you’re buying ABS online, the more common option is a shorter height (around 12 inches) at the same 29-inch width.
Either way, the concept is the same: cut the outline, then cut the MOLLE slots/windows so straps can weave through.
Material Choice: ABS Plastic Makes Sense
I went with ABS plastic because it’s tough and doesn’t care about real life. This is the kind of material that can take scuffs, vibration, water, and grime without falling apart. It’s not going to look like a laser-cut boutique part—and that’s kind of the point. It’s affordable, durable, and easy to replace if you ever want to revise the design.
One note from my build: ABS has a textured “hair cell” side and a smoother/shinier side. If I did it again, I’d be more deliberate about which side faces out depending on whether I’m painting.
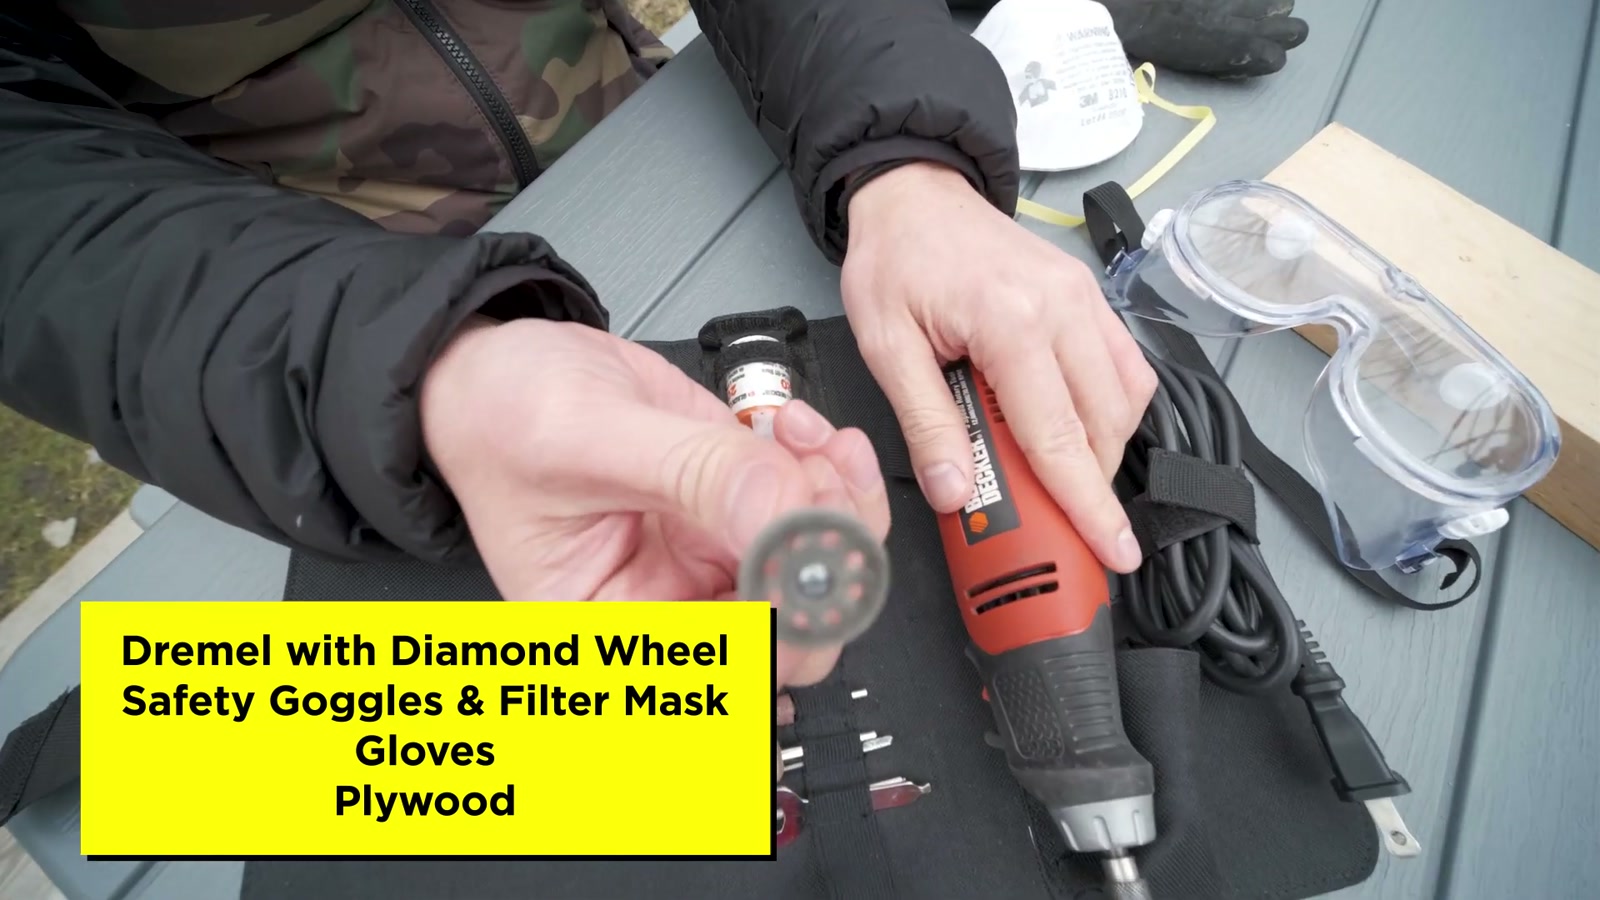
Cutting and Shaping: Functional Over Perfect
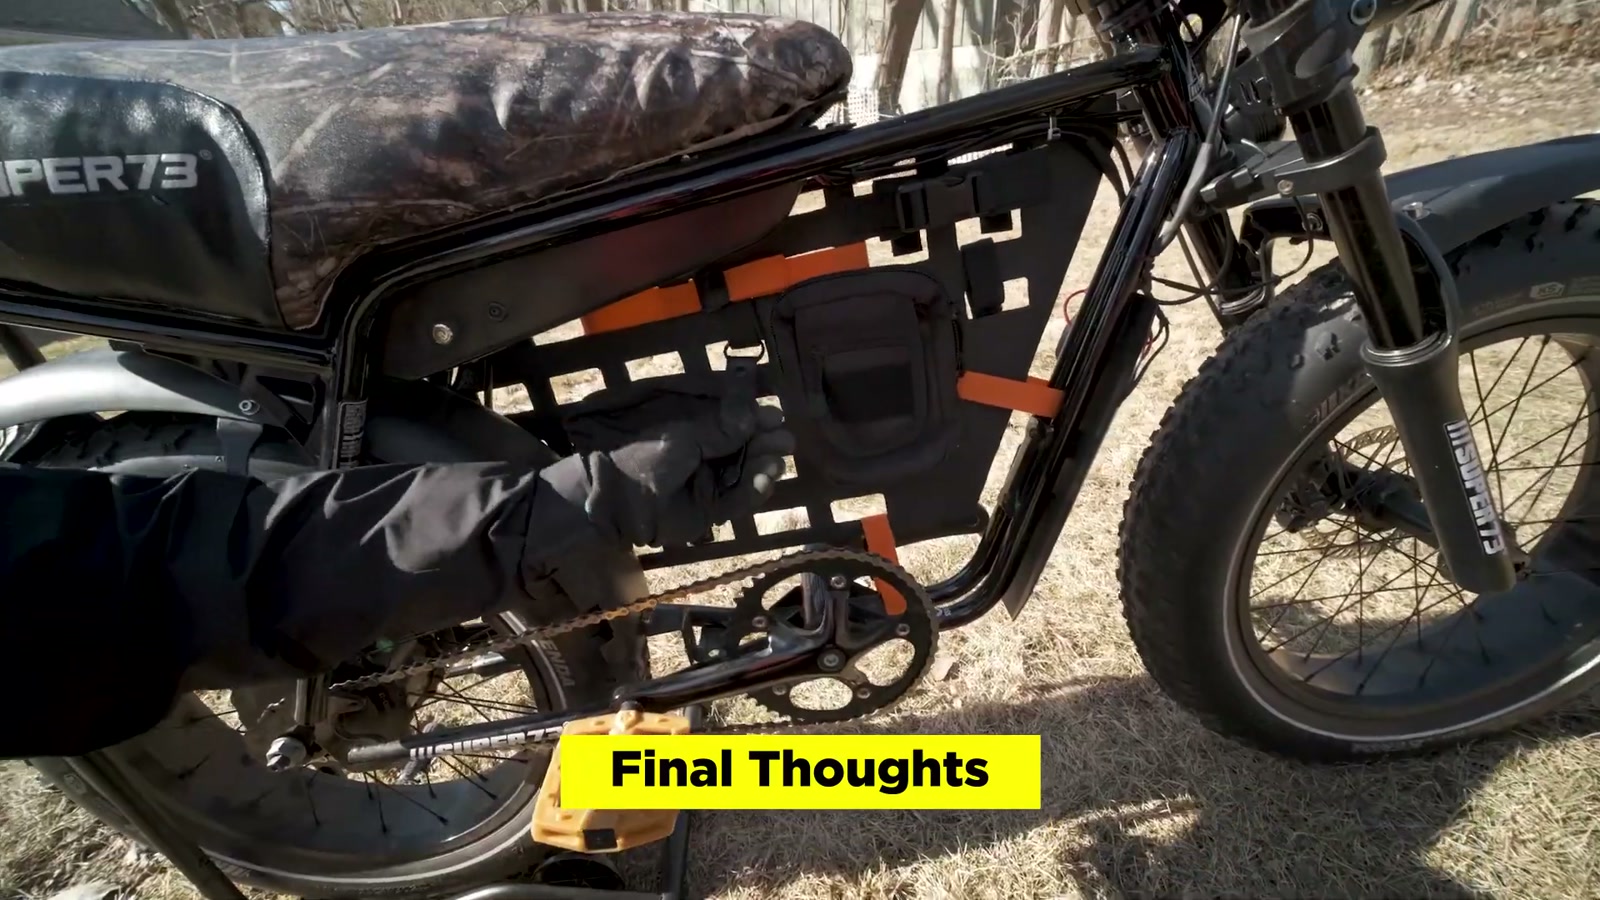
I cut the ABS using a Dremel with a diamond wheel. This part is messy and definitely more “garage-made” than precision-manufactured. The cutouts don’t need to be perfect to work. Once pouches are mounted and everything is strapped down, the panel reads clean on the bike.
After cutting, I cleaned up the edges with a file and sandpaper. That little bit of finishing makes a big difference—both for looks and so straps don’t snag.
Safety matters here: eye protection, mask, gloves, and ideally doing it outside. ABS dust isn’t something you want to breathe, and a rotary tool can get away from you fast.
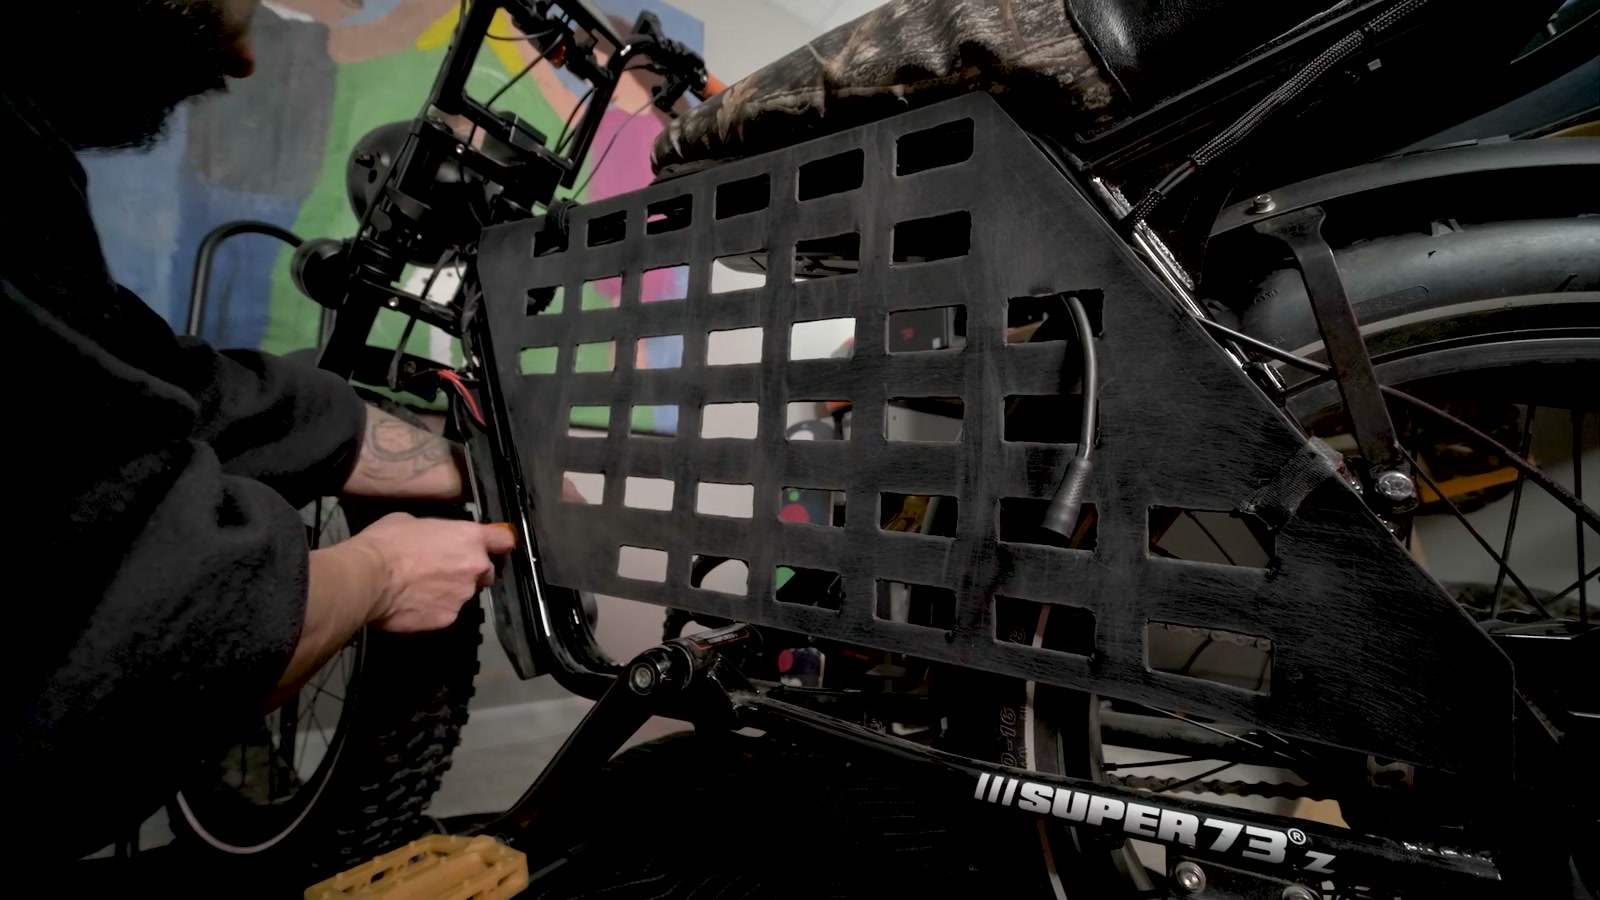
Test Fit and Mounting: Keeping It Solid
Before paint, I test fit the panel and made sure the motor wire had a clean pass-through.
Mounting strategy is what makes this feel “OEM” versus flimsy:
Zip ties at key mounting points (top and corners)
Nylon/utility straps at the bottom to remove flex and let me tension it
Once I pulled everything taut, the panel felt secure. That’s the whole goal—because the second you start hanging pouches off it, you’ll notice any flex immediately.
Placement Matters: Pedal Clearance and Practicality
I mounted the panel so accessories sit tucked under the frame rather than bulging out into my pedaling space.
The difference is huge. I can pedal normally without knee rub or heel strikes, and the bags sit protected in the frame instead of being the first thing to hit if I brush past something.
Painting: Matching the Bike’s Look
After sanding the smooth side, I hit it with a gloss black paint/primer that bonds to plastic. The end result looked right at home on the Z1. Gloss black is a great call if you want it to blend into the frame and look less like a DIY add-on.
If you like the raw tactical vibe, you can also skip paint and just run the textured side outward. I wanted mine to match.
Real-World Ride Impressions
Once it was mounted and loaded up with a couple tactical pouches and small straps, the bike felt more complete.
What I cared about most:
It stayed out of the way while pedaling
The load felt centered and stable
No annoying rattles or shifting once I cinched the straps tight
This mod changed how I use the Z1 day-to-day. I’m far more likely to bring a lock and a small kit now because it’s easy to mount and it doesn’t make the bike feel cluttered.
What We Like
Makes the Z1 frame actually useful for carrying gear
Modular setup: pouches and straps can change per ride
Cheap and durable when built from ABS
Sits cleanly inside the frame and keeps weight centered
Doesn’t need perfect cuts to look good once installed
Things To Consider
Cutting ABS with a Dremel takes patience (and safety gear)
A local plastics shop can be the easiest way to get the “best fit” size
Plan your mounting points so the panel is taut—flex disappears when it’s tensioned correctly
Decide early which side faces out if you’re painting (textured vs smooth)
Final Thoughts
This is one of my favorite kinds of upgrades: it’s inexpensive, it solves a daily annoyance, and it makes the bike more practical without ruining the Z1’s vibe.
If you’ve been riding with a backpack just to carry basics, a MOLLE panel in the frame is a simple way to move that weight onto the bike and keep your ride feeling lighter. Take your time on the template and mounting tension, and you’ll end up with something that looks clean and works even better.