
Custom Vinyl Wrap on the Freego X2 / X2 Pro: The Easiest Way I’ve Found to Make It Yours
January 23, 2025
Some links in this article may be affiliate links. If you buy through them, we may earn a small commission at no extra cost to you.
The Freego X2 / X2 Pro has a ton of presence as-is, but the stock look (especially that dull silver) didn’t really feel like “my” bike. I wanted something that looked intentional, added a bit of protection, and didn’t require tearing the whole bike down for powder coat.

So I built a precision-sized PDF template and wrapped my own X2 Pro. After living with it, I’m convinced a vinyl wrap is one of the best bang-for-buck upgrades you can do for this platform—especially because the X2’s frame shapes are friendly to wrap compared to bikes with a bunch of tight curves.
Here’s how the whole process went, what I’d do again, and what you should know before you commit.
Vinyl wrap vs. powder coat (why I wrapped mine)
A vinyl wrap hits a sweet spot for a bike like the X2 Pro.
First, it’s a legit layer of scratch protection, particularly if you choose a thicker vinyl or reflective material. Second, it’s the easiest way to personalize the bike without a permanent commitment.
Powder coating is still the “ultimate” if you want a forever color and the most factory-looking finish, but it comes with real tradeoffs: full disassembly, more cost, and waiting on a shop.
With vinyl, if I get bored, change the theme, or decide to sell the bike later, I can peel it off and go back to stock.
The big con: installation is on you
Vinyl is affordable and flexible, but you’re trading money for a bit of patience.
If you’ve never installed vinyl before, there’s a learning curve—alignment, bubbles, and edges can get annoying if you rush. The good news is the Freego X2 / X2 Pro frame doesn’t have a lot of aggressive compound curves, so it’s far more forgiving than something like a Sur Ron-style chassis with tighter shapes.
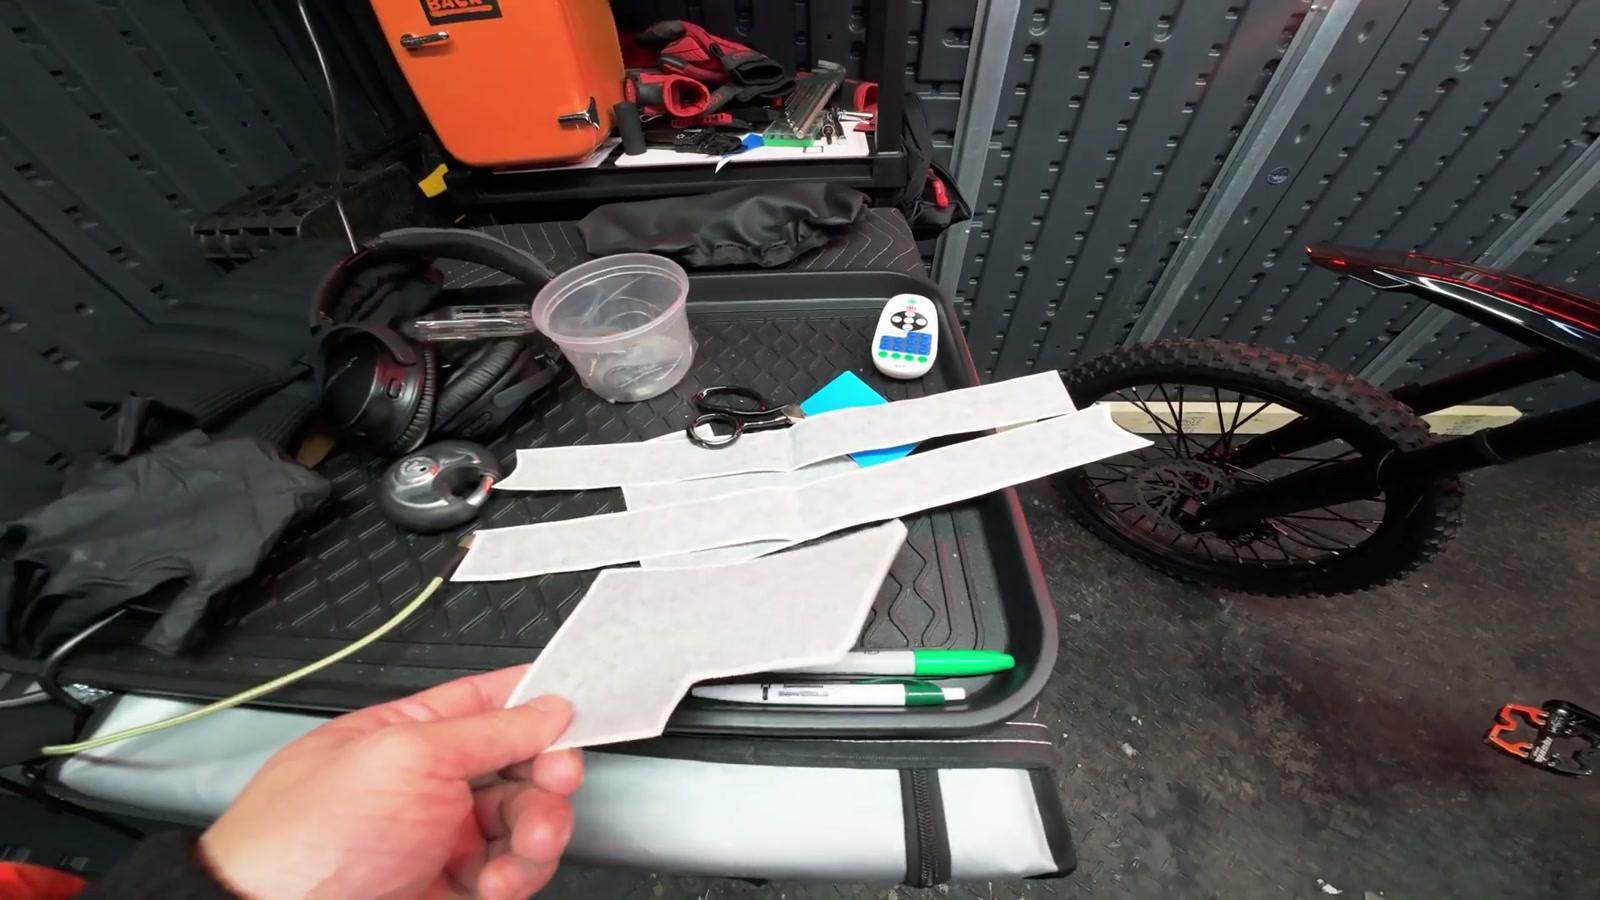
What’s included in the Freego X2 / X2 Pro vinyl wrap template
The whole goal with this template was to remove the guesswork—so you’re not eyeballing strips, wasting material, or doing endless trial-and-error with scissors.
The kit is laid out as multiple pieces that cover the main areas I wanted protected and visually “tied together,” including:
Upper frame pieces (left and right)
Long side strips along the frame (left and right)
Battery plate piece (this works as a clean logo delete, since the Freego branding runs across that plate)
Subframe pieces (left and right, running back under the seat area)
Swingarm pieces (left and right)
A top piece section as part of the overall layout
I also built in extra pieces in the layout so you’ve got some margin for error—because mistakes happen, and having a little extra vinyl available makes the whole job less stressful.

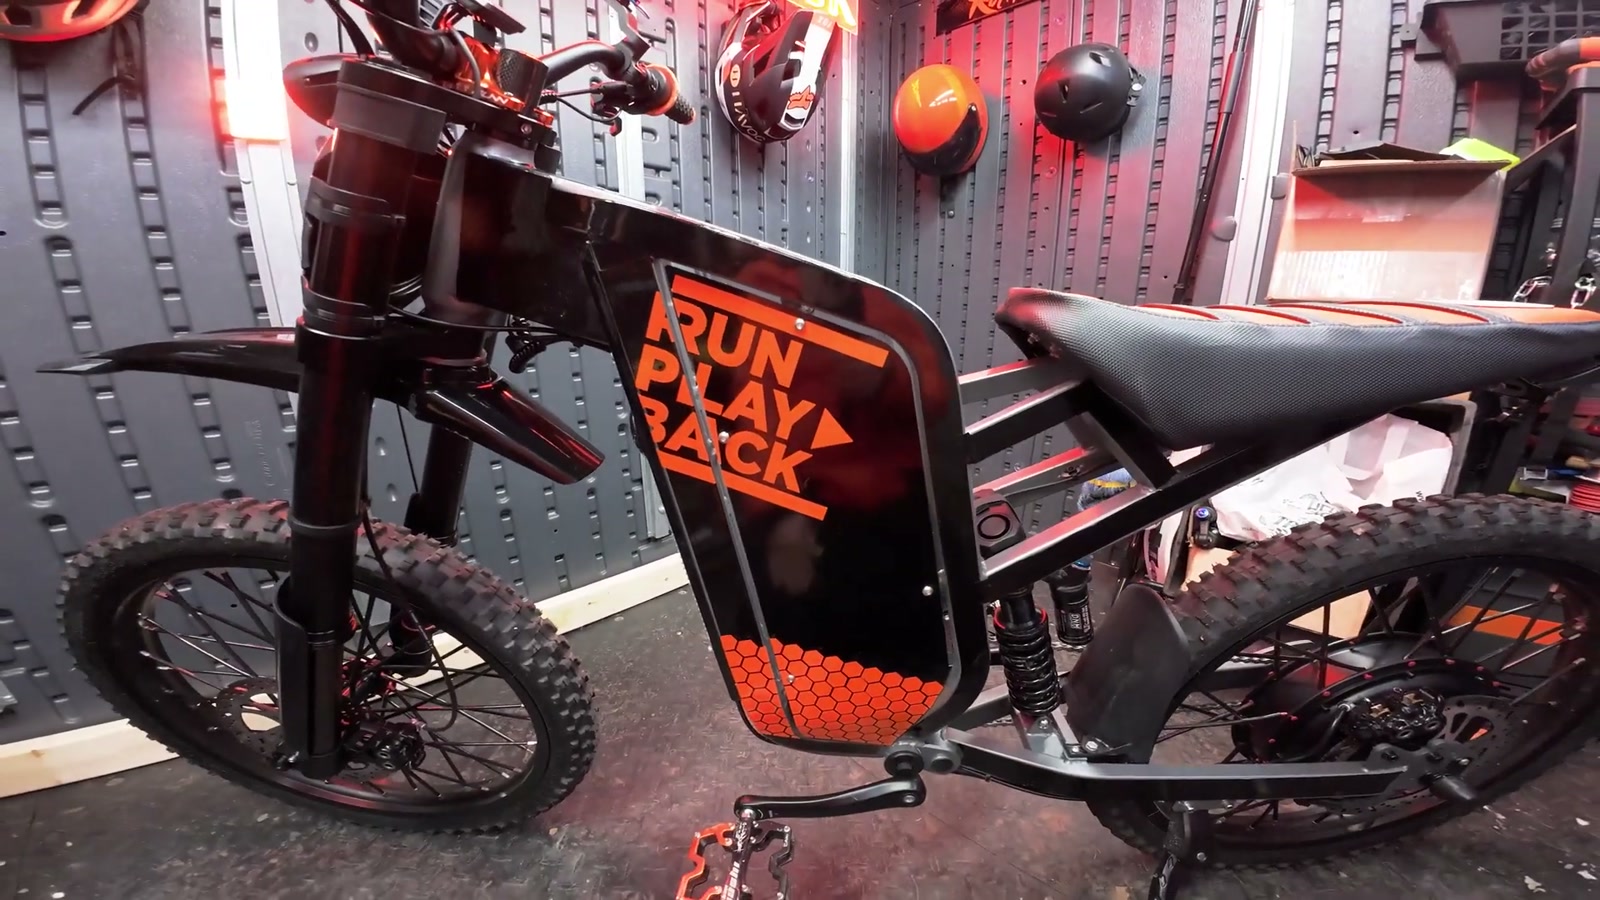
Designing a colorway that looks “factory”
My favorite wraps are the ones that look like the bike came that way.
On my setup, I went for a design that visually flows from the battery plate onto the frame so it reads like one continuous graphic, not a bunch of random stickers. I also kept the angles aligned with the bike’s body lines. That detail sounds small, but it makes the finished look feel cleaner and more intentional.
For extra pop and nighttime visibility, I added reflective hex decals. During the day they add texture and contrast, and at night they light up when headlights hit them.
Cutting the vinyl: DIY vs. professional cuts
You can absolutely do this on a budget:
Print the PDF template
Tape it to a sheet of vinyl
Trace it
Cut it by hand
That works, but the finish depends on your patience and cutting skills.
If you want crisp edges and a more professional look, getting the pieces cut by a vinyl cutting service is the move. I’ve had great results going that route, and it also opens up more options—different colors, different finishes, and more premium vinyl types.
Installation: how I applied it (and what actually mattered)
This is the part that decides whether the wrap looks “clean” or “homemade.”
Surface prep is everything
I cleaned the bike thoroughly with isopropyl alcohol and a cloth that won’t leave residue or fibers. Any oil, grime, or dust left behind can lead to lifting edges later.
The soapy water method saved me
For placement, I like using a little dish soap mixed with warm water. I lightly wet the surface so the vinyl can slide and be repositioned before it fully grabs.
Once it’s aligned, I squeegeed out the water and air bubbles using what I had on hand (a squeegee works, but even a card can do the job). Take your time here—this is where the clean look comes from.
Corners and angles: expect a couple relief cuts
On some angled sections, I needed to make a straight relief cut in the vinyl, reposition the piece, and slightly overlap the cut so it looks seamless. From normal standing distance, you don’t really notice it.
If you do get a small gap somewhere, it’s not the end of the world. I filled tiny areas with small vinyl patches as needed.
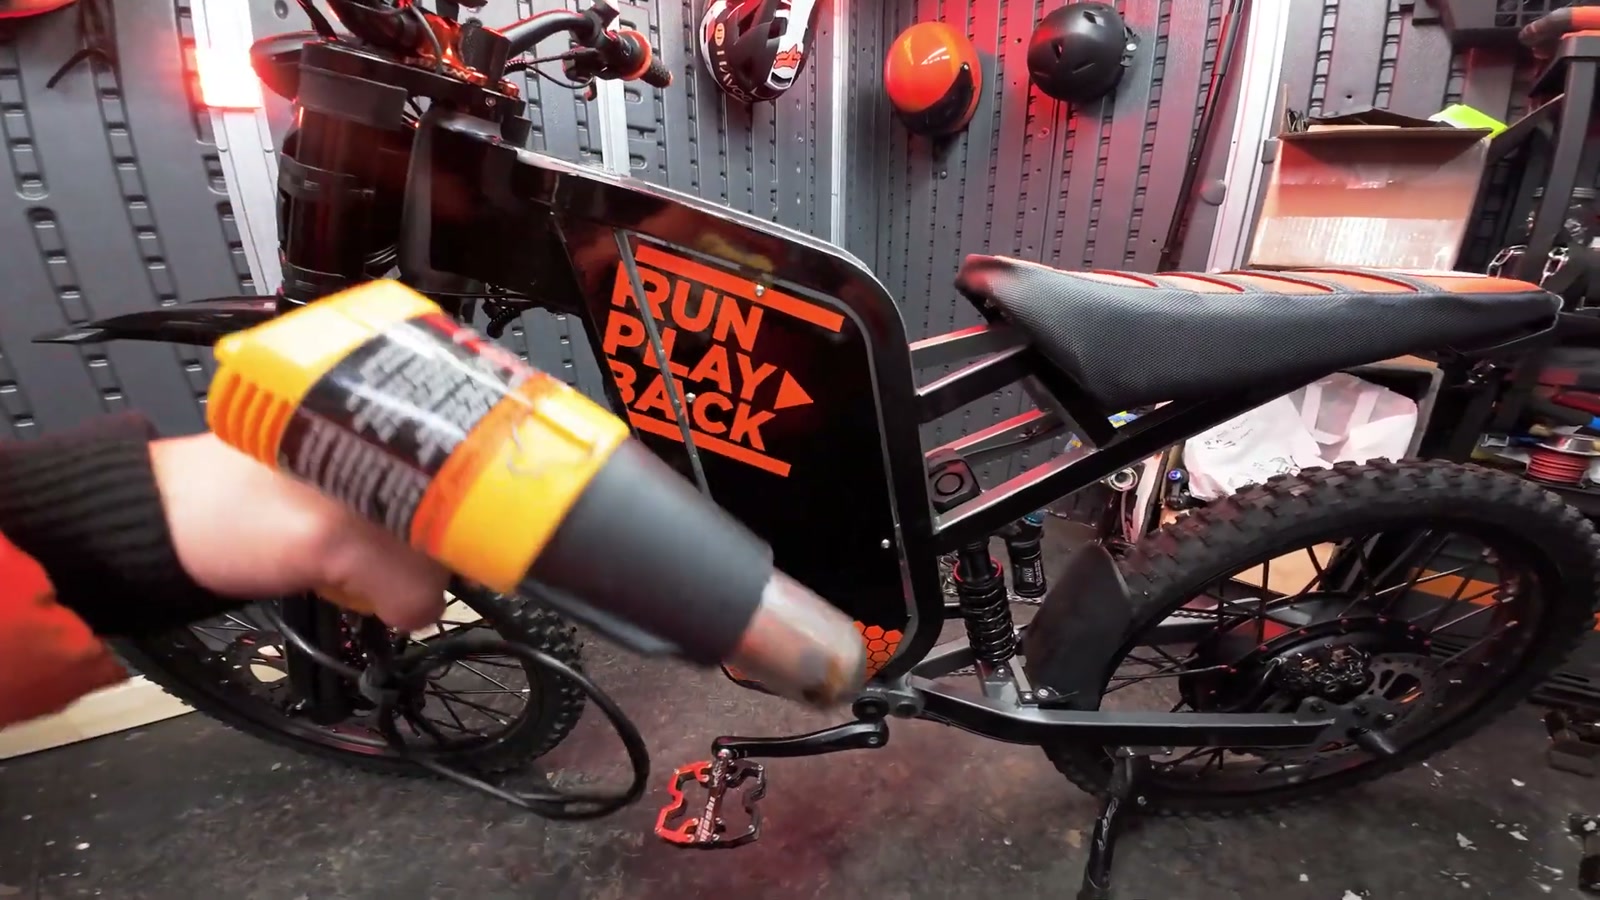
Heat gun to finish
After everything was placed, I used a heat gun to help the vinyl conform and stick. The key is to keep the heat moving—don’t park it in one spot, because you can damage the vinyl.
Then I went back over everything while it was still warm, smoothed edges, and checked again for bubbles. Any stubborn bubble can be popped with an X-Acto and pressed flat.
Cure time
I let it cure for 24–48 hours for best adhesion. In cold weather, it takes longer. In warm sun, it’s way easier.
Extra touches that completed my build
A couple small add-ons made the whole front end and cockpit feel more finished:
It’s a simple mod, but it gives you another spot to add a logo, vinyl, or a sticker if you want to lean into the moto look.
Seat cover upgrade
I added a Thrillseekers seat cover meant for a Sur Ron. Fitment isn’t perfect if you inspect it closely, but it’s close enough to work—and the grip is dramatically better than stock. The stock seat was slippery to the point where it got in the way if I was practicing technique (especially anything that shifts my body position a lot).
Real-world results: how it changed the bike day-to-day
The biggest difference is the vibe.
The bike looks more personal, more premium, and honestly just more fun to ride around town. The glossy black and bright accents pop way more than the stock silver, and I get more positive attention when I’m cruising through the city.
There’s also a practical side: brighter graphics and reflective elements help visibility in traffic. Depending on where you ride, that can be a major benefit—or you might prefer a more low-key look. Your city, your risk tolerance.
What We Like
Makes the Freego X2 / X2 Pro feel personal without committing to paint
Adds scratch protection in high-contact areas
Frame shape is relatively easy to wrap compared to more complex bikes
Logo delete on the battery plate cleans up the look
Can be removed later (great if you sell the bike or change themes)
Reflective decal options can improve nighttime visibility
Things To Consider
Prep and patience matter; rushing leads to lifting edges and bubbles
Some sections may require small relief cuts and overlaps for a seamless finish
Cold weather makes vinyl less cooperative and slows curing
DIY hand-cutting works, but professional cuts look noticeably cleaner
Bright colorways get attention (good or bad depending on where you ride)
Final Thoughts
If you want the easiest, most cost-effective way to transform a Freego X2 / X2 Pro, a vinyl wrap is it.
I like it because it’s practical (protection), expressive (custom colorways), and reversible (peel it off whenever). With a solid template and a careful install, the finished result looks way closer to a factory design than most people expect.
If you’ve been staring at your X2 and thinking it needs something—this is a fun, weekend-level project that changes the whole feel of the bike.