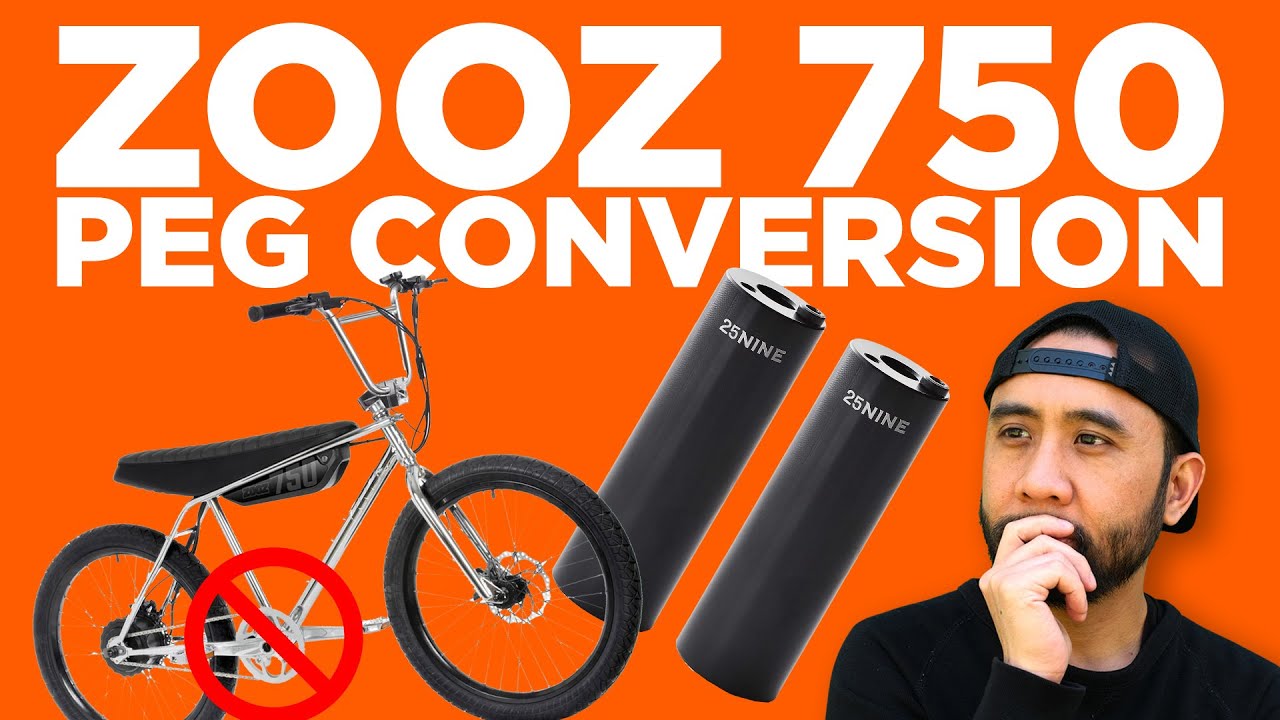
Pegs Over Pedals: How I Did a Crankset Delete on the Zooz UU750 (And How It Rides)
September 3, 2023
Some links in this article may be affiliate links. If you buy through them, we may earn a small commission at no extra cost to you.
There are a couple reasons you’d want pegs instead of pedals on an ebike like the Zooz UU750: you might be building a mini-bike style setup that’s easier to move around on, you might want a better platform for stunt-style riding, or you might simply find pegs more accessible depending on your mobility.
Before anything else: removing pedals can affect street legality depending on where you live. I’m not going to pretend that part doesn’t matter. Do your own local homework and ride accordingly.
With that out of the way, here’s exactly how I did my pedal-and-crank delete and what changed on the first ride.
Pegs over pedals: what changes in real life
The biggest difference is the vibe. With pedals, the Zooz feels like an ebike that can be pedaled. With pegs, it immediately leans more “mini-bike,” where foot placement, balance, and body position matter more than spinning a cadence.
On my first ride, my muscle memory kept hunting for pedals. But once I relaxed, my feet landed in a pretty natural stance and I felt comfortable standing on the bike.
Maneuvering also felt easy—almost easier—because I wasn’t thinking about pedal position or pedal strikes. In sharper turns, I found it helped to put a foot down more readily, especially while I was getting used to the new stance.
One important tradeoff: without pedals, you lose that extra torque you can add by pedaling. You’re committing to throttle-only riding (and body English), so the whole experience becomes about stability, control, and how planted your feet feel.
Tools and parts I used
I kept this conversion pretty straightforward and used common bike tools plus a few hardware-store style pieces.
Tools
Shimano TL-FC32 Bottom Bracket Tool: https://amzn.to/3PxysCl
Park Tool BBT-22 Bracket Tool: https://amzn.to/3Pnbtti
Park Tool CCP-22 Crank Puller: https://amzn.to/3ZyL0wj
Two 3/8" Drive Socket Wrenches: https://amzn.to/3qXDJtf
Two 3/8" Socket Extensions: https://amzn.to/3sDbMr4
Two 7/8" Deep Sockets: https://amzn.to/3qWmc4z
10mm / 5mm Allen Key: https://amzn.to/45DcdQQ
Scissors: https://amzn.to/3Ekujv0
Parts
Two 25NINE Bike Pegs: https://amzn.to/3r1oOyb
Five 14mm Washers: https://amzn.to/47YSEnt
One 14mm x 130mm Hex Bolt: https://amzn.to/45WwJvo
One 14mm Nylon Nut: https://amzn.to/46dTBab
Two Standard Bottom Bracket Cups: https://amzn.to/3ElvL02
Zipties: https://amzn.to/3R5Pzw1
Grip Tape (optional but I recommend it): https://amzn.to/3R7KAuY

The install, step by step (what mattered most)
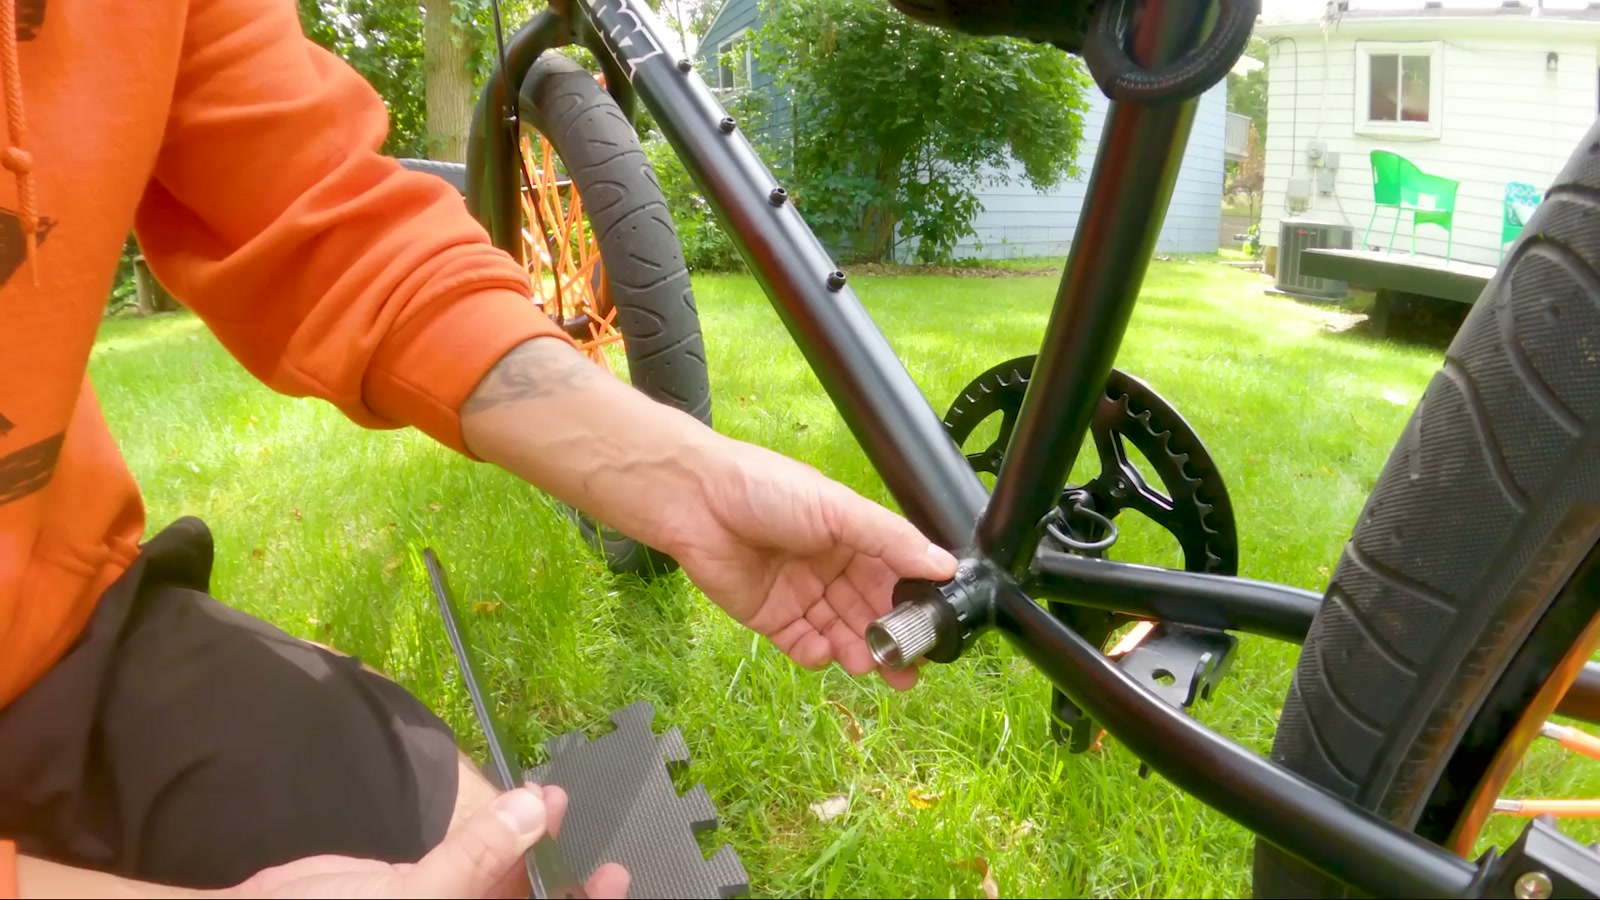
Remove the crank hardware carefully
I started by pulling the crank side cap with a 10mm Allen key. That cap is plastic, so I took it easy—this is not the moment for maximum torque.
Then I loosened the crank arm bolts with a 5mm Allen key.
Pull the bottom bracket cup and slide the crank out
Using the Shimano bottom bracket tool, I loosened the bracket cup (counterclockwise on that side). Once the cup was out, I could work the crank arm out.
Key detail: the pedal assist sensor is attached when you slide things out. I went slow and used just a bit of force, then carefully slid the sensor down and fished the wire upward so it wouldn’t get yanked.
Empty the bottom bracket and install standard cups
Once the crank assembly was out, the bottom bracket area was basically empty.
I swapped in standard bottom bracket cups, reusing the stock bottom bracket sleeve.
Right-side cup: went in counterclockwise.
Left-side cup: went in clockwise.
I hand-tightened first, then snugged them up with the appropriate tools.
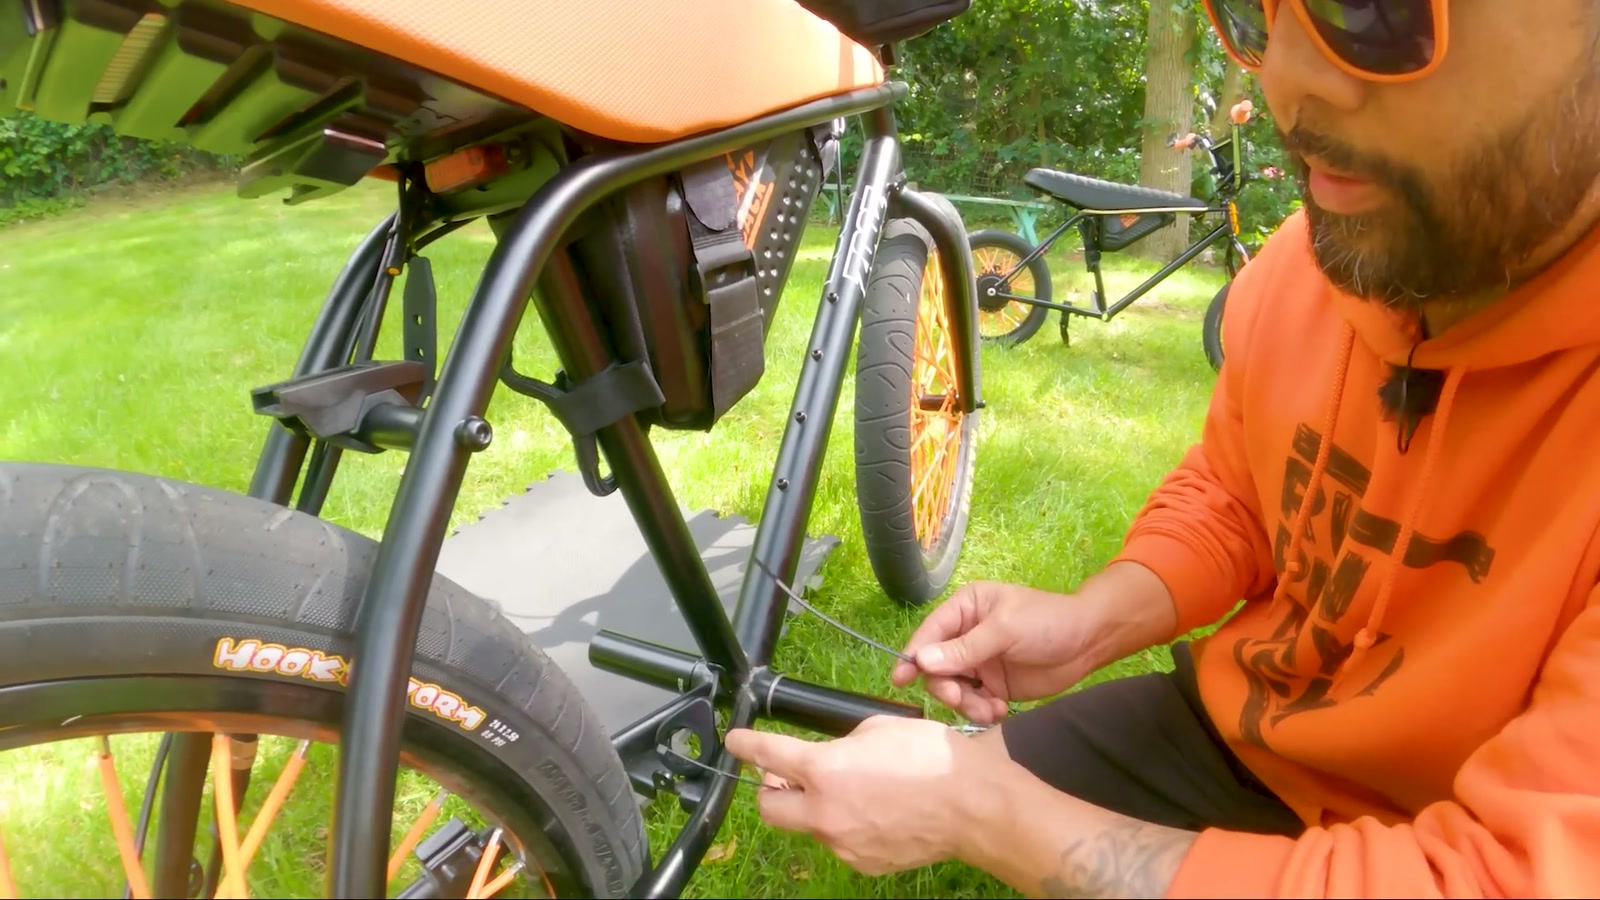
Build the “peg axle” hardware stack
This is where the washers and long bolt matter.
My stack:
Three washers on the bolt first
Feed the bolt into the first peg
Add one outer washer (this helps it sit flat against the bottom bracket cup)
Then I fed the whole assembly through from the left side, placed the outer washer against the right bottom bracket cup, and installed the second peg on the right.
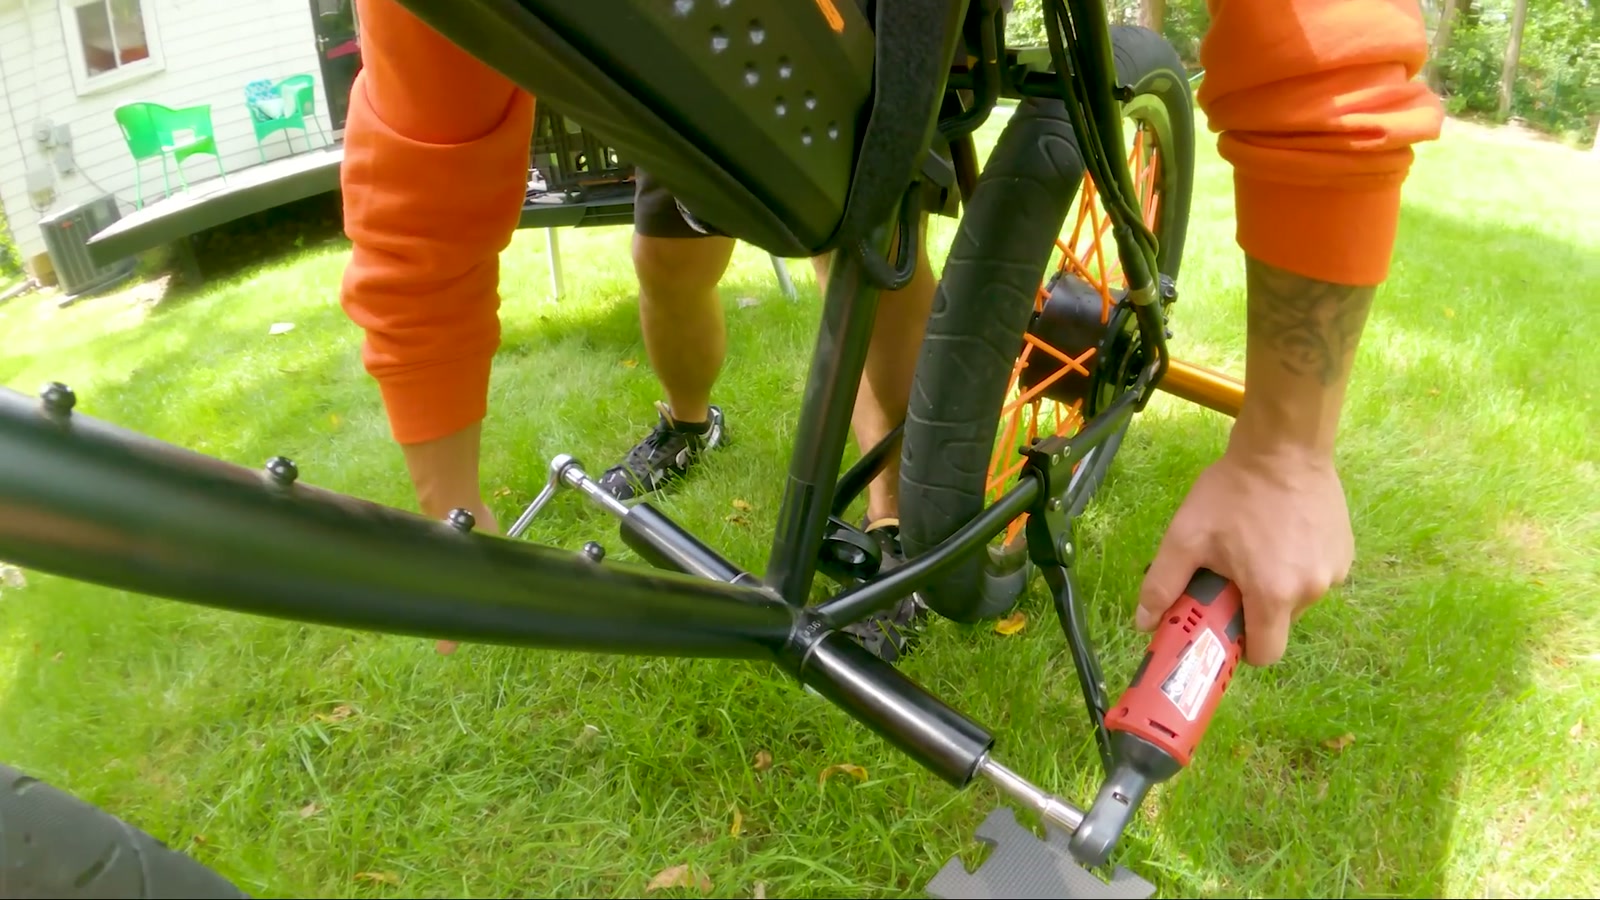
Tighten it down (solo-friendly tip)
Tightening is easier with two people, but I did it solo.
I used two socket wrenches with extensions and 7/8" deep sockets. I seated the nylon nut inside one socket, lined both sockets up, and tightened until everything cinched down evenly.
As it tightens, I kept checking that:
The pegs stayed centered on the bracket cups
Everything stayed straight and aligned
Once it was snug and centered, the platform felt solid.
Deal with the pedal assist sensor wire
At this point, you can either remove the pedal assist sensor from the controller or just secure it.
Because I wanted the option to go back to pedals later (without re-routing wiring through the frame), I zip-tied it neatly out of the way.
Add grip tape (I’d do this immediately)
The 25NINE pegs are smooth. On the first ride, it was obvious why grip matters: you want your feet to stick when you stand up, shift weight, or hit bumps.
I cut skateboard grip tape to fit and wrapped the peg surfaces. It made the setup feel more planted and confidence-inspiring.
First ride impressions
Once I rolled out, foot placement felt natural pretty quickly.
Standing up on the bike was easy, and the bike felt maneuverable—especially transitioning my stance and shifting weight. Without pedals, I wasn’t getting that “extra push” feeling, but I still had plenty of control for normal riding.
In tight, sharp turns, I found it helped to be ready to dab a foot down. That’s not a flaw, it’s just part of how the bike behaves when your feet aren’t locked into a pedaling rhythm.
Overall, the conversion delivered exactly what I wanted: a clean, simple platform that feels more like a mini-bike setup.
What We Like
The stance feels natural surprisingly fast
Easy to stand and maneuver without worrying about pedal position
The conversion isn’t permanent; you can revert later
Tons of room to move your feet and shift your weight
Things To Consider
Peg-only setups may not be street legal where you live
You lose the ability to add torque by pedaling
Smooth pegs can be slippery; grip tape is highly recommended
Tightening and centering the peg assembly takes patience (a second person helps)
Final Thoughts
This crankset delete and peg conversion is one of those mods that instantly changes the personality of the Zooz UU750. If you’re chasing that mini-bike feel, want a more accessible foot platform, or just prefer the freedom of moving around on the bike, it’s a satisfying upgrade.
My biggest advice: take your time with the bottom bracket work, keep the pegs centered as you tighten, and don’t skip grip tape. That last part is what made the bike feel truly usable rather than just “cool.”