
Sur-Ron X Supermoto First Mods: Street Wheels, Brighter Lights, and a More City-Friendly Setup
September 6, 2021
Some links in this article may be affiliate links. If you buy through them, we may earn a small commission at no extra cost to you.
I bought the Sur-Ron X because I wanted something that felt like a dirt bike and a mountain bike had a futuristic electric baby. It’s light enough to throw around, torquey enough to get spicy if you’re not careful, and it’s just plain fun.

But I also ride a lot of streets. And when most of your miles are pavement, the stock setup starts to feel like it’s leaving comfort, stability, and “daily ride” practicality on the table.
So I went after my first round of mods to push this Sur-Ron X toward a supermoto-style street setup, then I took it out into the real world with friends for a proper downtown cruise.
The big change: Supermoto wheels for street riding
The centerpiece of the whole transformation was the LunaCycle Sur-Ron Super Moto Conversion Kit.
Supermoto, in this context, is basically street tires on a dirt bike chassis. The immediate difference for me was ride stance and confidence.
Lower height, calmer feel
As soon as the 17-inch wheels went on, the bike sat noticeably lower. My feet felt closer to the ground at stops, and that alone made the Sur-Ron feel more relaxed in traffic.
The lower center of gravity also gave it a more planted, street-friendly vibe. It still feels like a Sur-Ron (light and flickable), but it’s less “tippy dirt bike” and more “let’s carve through the city.”
Looks matter (and this look works)
I’ll be honest: part of the reason to go supermoto is aesthetics. The smaller rims and street rubber make the bike look tighter and more intentional for pavement. With the right lighting and a clean cockpit, it starts to feel like a mini electric hooligan machine.
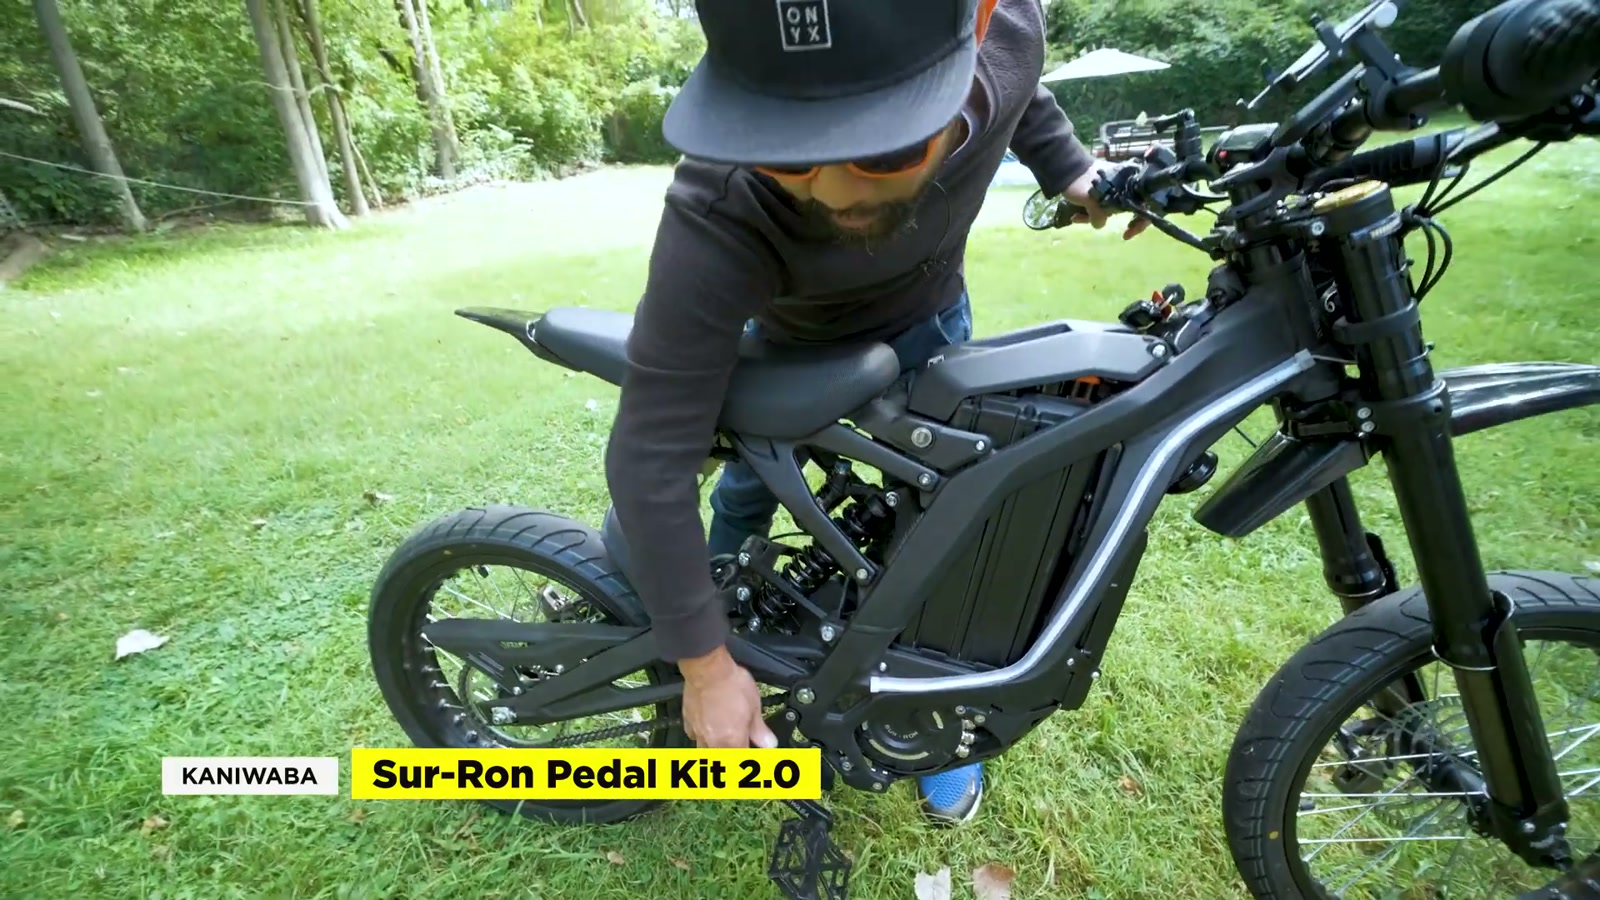
Kaniwaba pedals: not for pedaling, but for riding
Next up were the Kaniwaba pedals.
I’m not using them to propel the bike. I didn’t install the chain-connected kit or the cadence sensor setup. For my use, the value is simple:
I can change how I position my feet depending on how I’m riding
It helps the bike read a little more “e-bike” around town
The bracket setup feels more durable than the stock brackets
There’s also a brace bar and bearings in the assembly, so it isn’t just cosmetic. It adds structure and feels like it belongs on the bike.
Yes, “pedals on something that doesn’t really pedal” is controversial. I get it. For me, it’s about comfort and utility around town, with the option to go further later if I decide to.
GritShift headlight: finally bright enough
The stock Sur-Ron headlight works, but once you ride around real traffic and real street lighting, you start wanting something with more presence.
I installed the GritShift headlight (plug-and-play), and the difference is not subtle.
It’s bright. Like, seriously bright.
This thing can absolutely blast light. The upside is you become much more visible and you get a stronger beam for night rides.
The downside is that it can be blinding up close. To be a good citizen, I angled it downward so it lights the road instead of torching eyeballs.
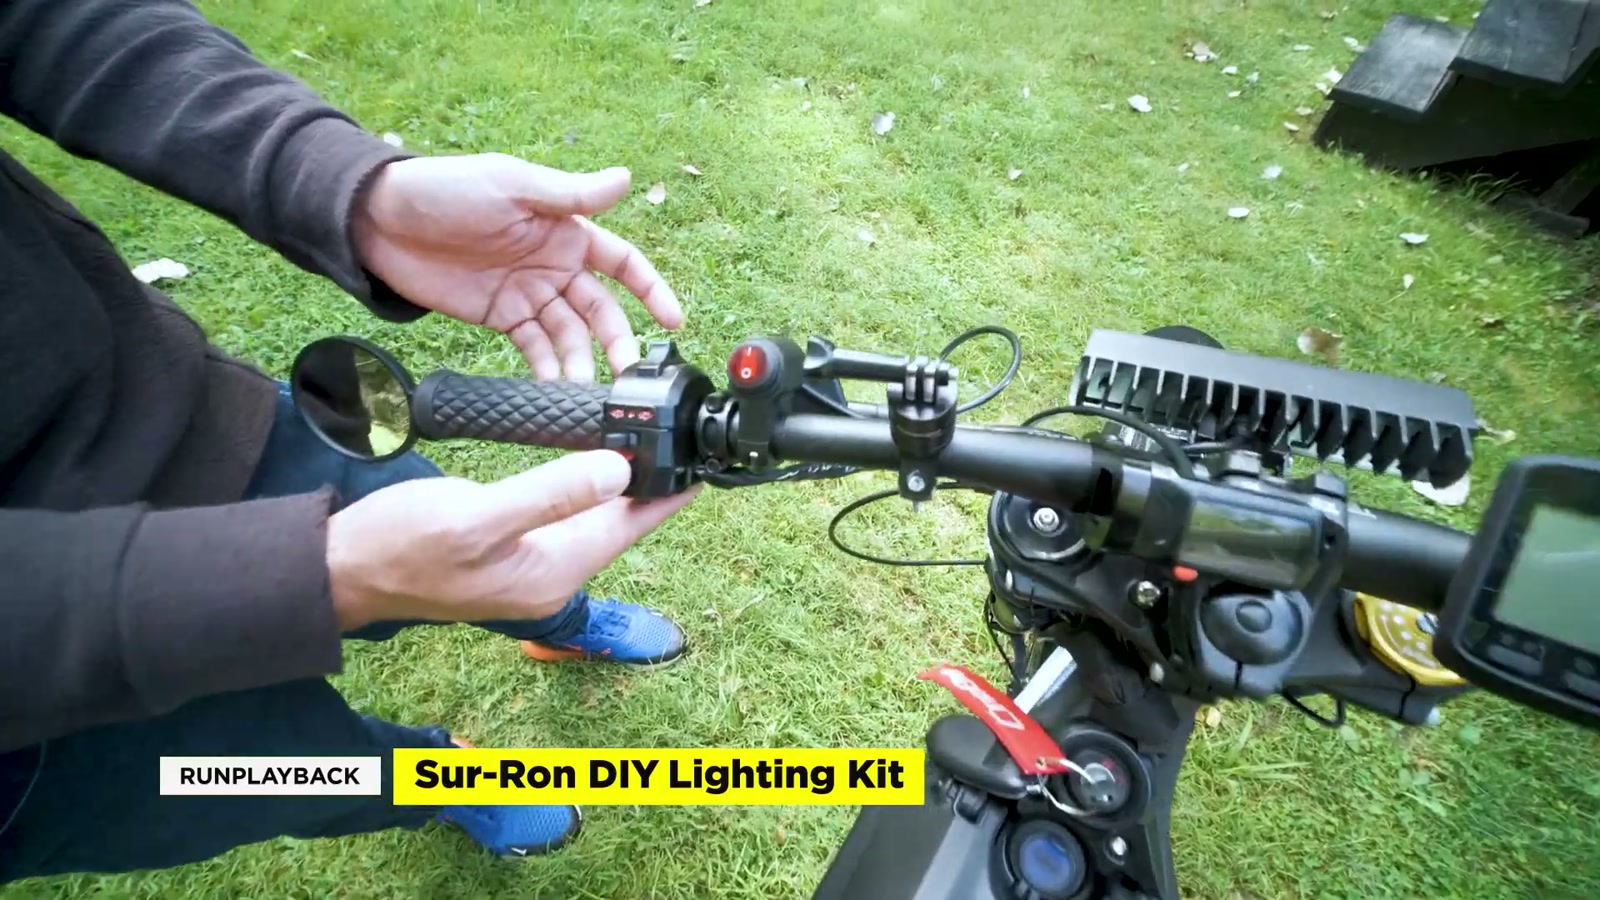
Headlight kill switch: stealth and battery-saving convenience
I added the matching headlight kill switch harness, and this is one of those small upgrades that makes the whole bike feel more “finished.”
Being able to quickly shut off the headlight is useful when:
I want to conserve power
I’m riding in situations where I don’t need a super bright beam
I just want a lower-profile vibe
It doesn’t turn off the tail light, which is totally fine with me.
Grips: a simple upgrade that changes control feel
I swapped to new moto-style grips, and it improved the bike more than I expected.
The rubber feels thicker and the pattern locks my hands in better. The biggest real-world payoff is throttle feel: the inputs feel more deliberate and precise, especially when I’m feathering power in tighter riding.
Mirror: minimal, but useful
I went with a single bar-end mirror on the left side.
It’s small, but that’s the point. I wanted just enough rear awareness without cluttering the bars or ruining the look of the build.
Display relocator: cleaner cockpit, better layout
The display relocator bracket moved the display away from the stock position.
It ends up mounted at a bit of an angle (that’s just the reality of the bracket and the space you have), but functionally it’s fine. More importantly, it opened up room for the switchgear I wanted to run.
DIY lighting: turn signals and a better rear setup
This was the most custom part of the build: a DIY lighting kit approach using:
Fork-mounted indicators up front
Side indicators
An aftermarket tail light with a license plate holder
The setup reminds me of what I’ve run on other e-moto/e-bike-style rides. The tail solution is popular for a reason: it fits the vibe and it’s surprisingly adaptable to mount with basic hardware.
How it behaves on the street
The turn signal effect has that flowing/sequential look, which gives the bike a more “finished vehicle” feel at night.
The only real quirk is timing: the fork indicators and the rear lighting aren’t perfectly synced because of relay differences. In real riding, it doesn’t matter much—it’s still clearly signaling.
A key practical win: I didn’t need step-down converters. I tapped into the 12V at the headlight and the 12V coming out of the tail light, which made the wiring process way more straightforward (assuming you’re comfortable doing basic electrical work).
Real-world ride impressions: downtown is where this setup makes sense
After the mods, I took the Sur-Ron out for a group ride in downtown Ann Arbor.
This is the environment where an electric bike like the Sur-Ron really earns its keep:
No gas
No clutch work
No shifting
Instant torque (sometimes too instant)
Easy to maneuver when things get tight
One thing I always respect about the Sur-Ron is how quickly it can get you into trouble if you’re careless. The motor placement and torque delivery feel different than heavier bikes like the Onyx RCR—more eager to lift, more eager to surprise you.
With the supermoto wheels lowering the bike, it felt more stable and comfortable in stop-and-go city moments. That alone made the whole setup feel more “dailyable.”
What We Like
The supermoto wheel setup lowers the bike and makes street riding feel more confident
Much more comfortable stance at stops (especially in traffic)
GritShift headlight output is a huge visibility upgrade
Headlight kill switch is simple, clean, and genuinely useful
New grips improved throttle precision and overall control
DIY lighting makes the bike feel more like a real street-ready machine
Things To Consider
The headlight is bright enough to annoy or blind people if it’s aimed too high
Kaniwaba pedals (without the drivetrain/cadence connection) are more about comfort and style than true pedal function
DIY lighting is doable, but you should be comfortable with basic wiring and troubleshooting
Some sequential lighting may not sync perfectly depending on built-in relays
Final Thoughts
These first mods pushed my Sur-Ron X from “cool electric dirt bike” into “street-friendly supermoto-style ripper.” The biggest ride difference came from the wheels: lower, more planted, and more comfortable in the city.
After that, lighting and cockpit tweaks made it feel safer and more usable in real traffic—exactly where a lot of us actually ride.
If you’re building a Sur-Ron primarily for pavement, this direction makes a ton of sense: start with the stance and contact points (wheels, grips), then move into visibility and street practicality.