
Essential First Mods for the EGO Power+ Mini Bike (What I Installed First)
April 21, 2024
Some links in this article may be affiliate links. If you buy through them, we may earn a small commission at no extra cost to you.
The EGO Power+ Mini Bike is already a blast in stock form, but it didn’t take long before I started tweaking it to fit how I actually ride. My goal with these first mods was simple: make it easier to live with, safer around traffic, and a little more “mini supermoto” in vibe—without turning the bike into a science project.
Below are the first changes I made, how the installs went, and what actually mattered once I got rolling.
The baseline: what I wanted to fix first
From day one, I wanted:
Better awareness in traffic (a mirror is non-negotiable for me)
More cleanliness (less spray up my back)
More utility (a place for keys/phone, plus a proper phone mount)
Smoother control at low speeds
More visibility at night, and turn signals for street legality where I live
A stealthier look (less neon green)
This list is exactly where I’d start if you just picked one of these bikes up.
Solar shed charging (my at-home routine)
Before we even get to the bike mods, I put together a small “solar shed” setup so I could top off batteries without constantly running extension cords.
I’m using a foldable 330W Pecron solar panel feeding a Pecron power station. I like foldable panels because I can aim them based on the sun and pack them away when I’m done. On a cloudy stretch I was only seeing about 72W coming in, while the EGO dual charger can draw around 611W—so in real life, I charge the power station when the sun’s good, then use that stored energy to refill batteries later.
For a small shed setup, it’s a clean, practical solution with plenty of ports (DC, USB, and AC) and it fits the “EV lifestyle” vibe of fueling up at home.
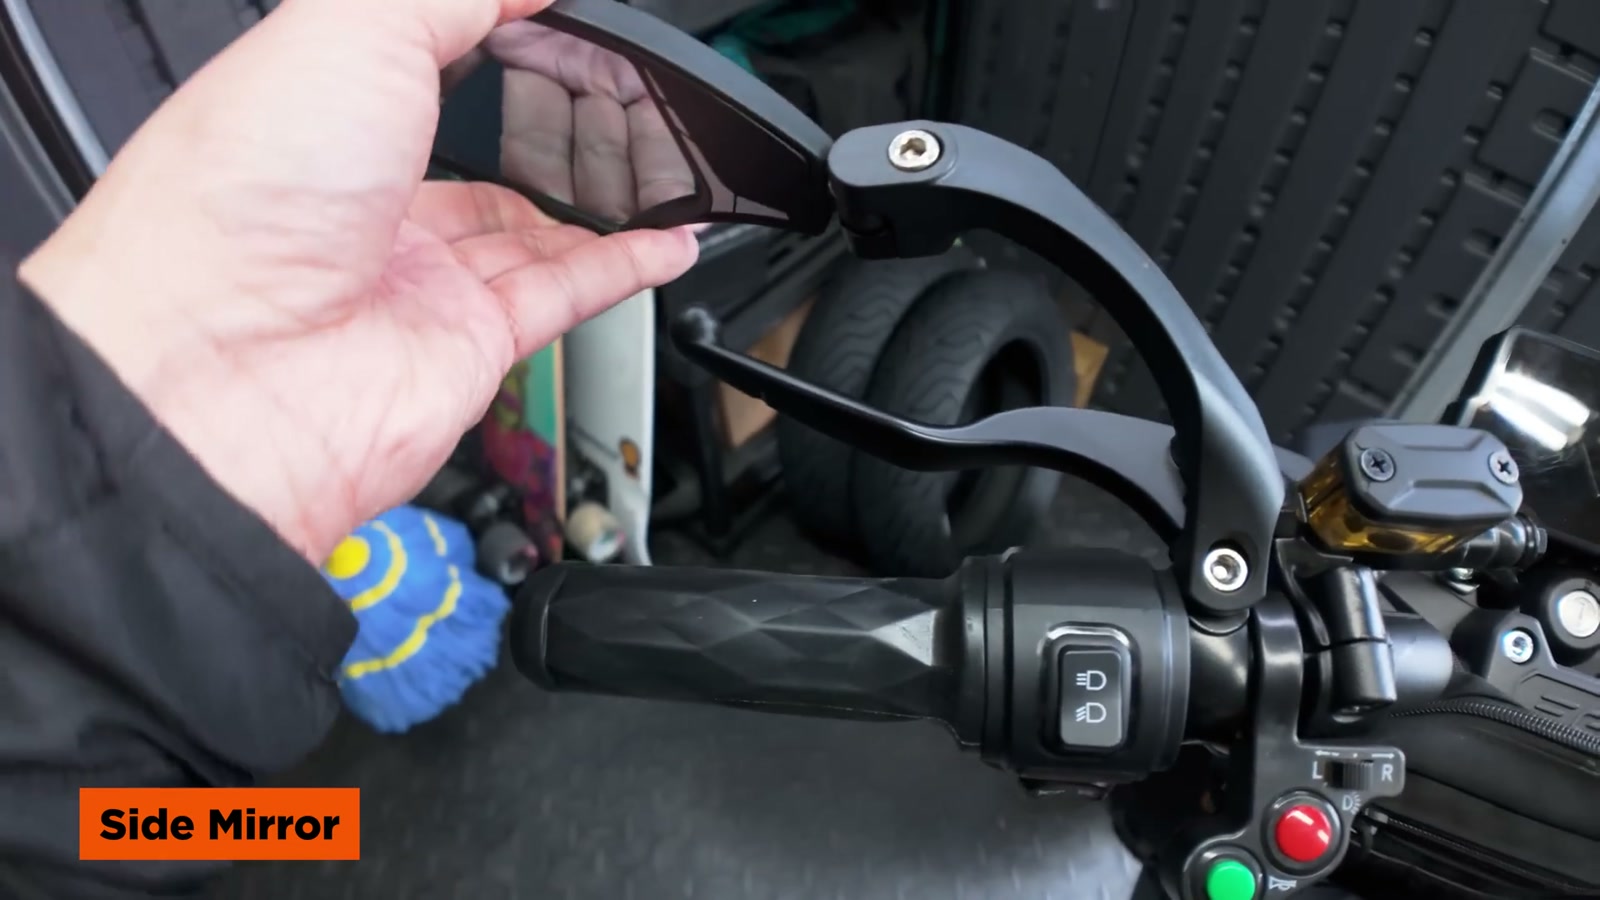
1) Left-side mirror: the easiest safety win
This was my first install because it instantly changes how confident I feel on the street. A left-mounted rear view mirror gives me a clear view of what’s happening behind me without doing constant shoulder checks.
Fitment-wise, it sits in a convenient spot between the switch area and the brake lever, and it doesn’t feel in the way.
If you plan to ride anywhere near cars, I’d do this before anything cosmetic.
2) Extended rear fender: less mess, cleaner profile
The stock rear fender does its job, but I wanted a sleeker line that follows the subframe and also helps with spray.
I installed a Surron-style extended rear fender. The nice surprise: three holes line up with the stock mounting points. The piece came with grommets in the holes, and once those were drilled out I could run bolts through and mount it up. I also added rubber grommets between the fender and subframe to take up the gap since it sits slightly raised.
On the road it’s a small quality-of-life improvement, and visually it gives the bike a more aggressive, “finished” silhouette.
3) Handlebar storage bag: simple, actually useful
I mounted a small tactical MOLLE-style storage bag to the handlebars. This is one of those mods that sounds boring until you ride with it—having a dedicated spot for keys, wallet, garage opener, or a phone is just convenient.
It straps on with two wraparound straps and didn’t interfere with steering at all. On a mini bike where you don’t have pockets of storage, it’s a win.
4) Quad Lock phone mount: set-it-and-forget-it
For navigation and quick access, I installed a Quad Lock phone mount. The main thing I care about with phone mounts is whether they stay locked in over bumps and rough pavement.
This one holds firm and keeps the phone right where I want it, especially when I’m following GPS. If you ride the mini bike often, a real mount is worth it.
5) Brake motor cutoff sensor: a smoother feel (with a quick workaround)
I disabled the left brake motor cutoff sensor to get rid of the abrupt “power drop” behavior when touching the brake.
In practice, this made the bike feel smoother and easier to modulate at low speeds. Instead of the motor instantly cutting when I feather the lever, I can roll speed off more precisely. It’s the same kind of tweak I do on pretty much every e-bike I own.
How I did it:
Removed the sensor with a Philips screwdriver
Used a zip tie to keep the blue button “closed” so braking doesn’t trigger motor cutoff
Wrapped it with cloth tape to keep the zip tie from sliding
Reinstalled the sensor (it doesn’t need to contact the lever for this workaround)
This is also reversible if you want to go back.
6) Center logo “delete”: stealth mode, easily reversible
I wanted the bike to feel more neutral and less loud, so I blacked out the center logo areas on both sides using matte vinyl.
I made a quick paper template, traced it onto vinyl, cut it with scissors, and laid it on. It doesn’t need to be perfect—once it’s on, the edges aren’t very noticeable. Best part: peel it off and the bike is stock again.
7) Front wheel disc cover: purely for balance (and I like it)
The rear wheel is visually “solid” because it’s the hub motor, and I wanted the front to match that look. So I made a front wheel disc cover out of thin ABS plastic.
This doesn’t add performance. It’s an aesthetic mod that makes the bike look more cohesive, especially from the side. I attached it with zip ties for now, and I may add some edging trim later to clean up the rougher edges.
If you want my template, I can share a PDF—just email me.

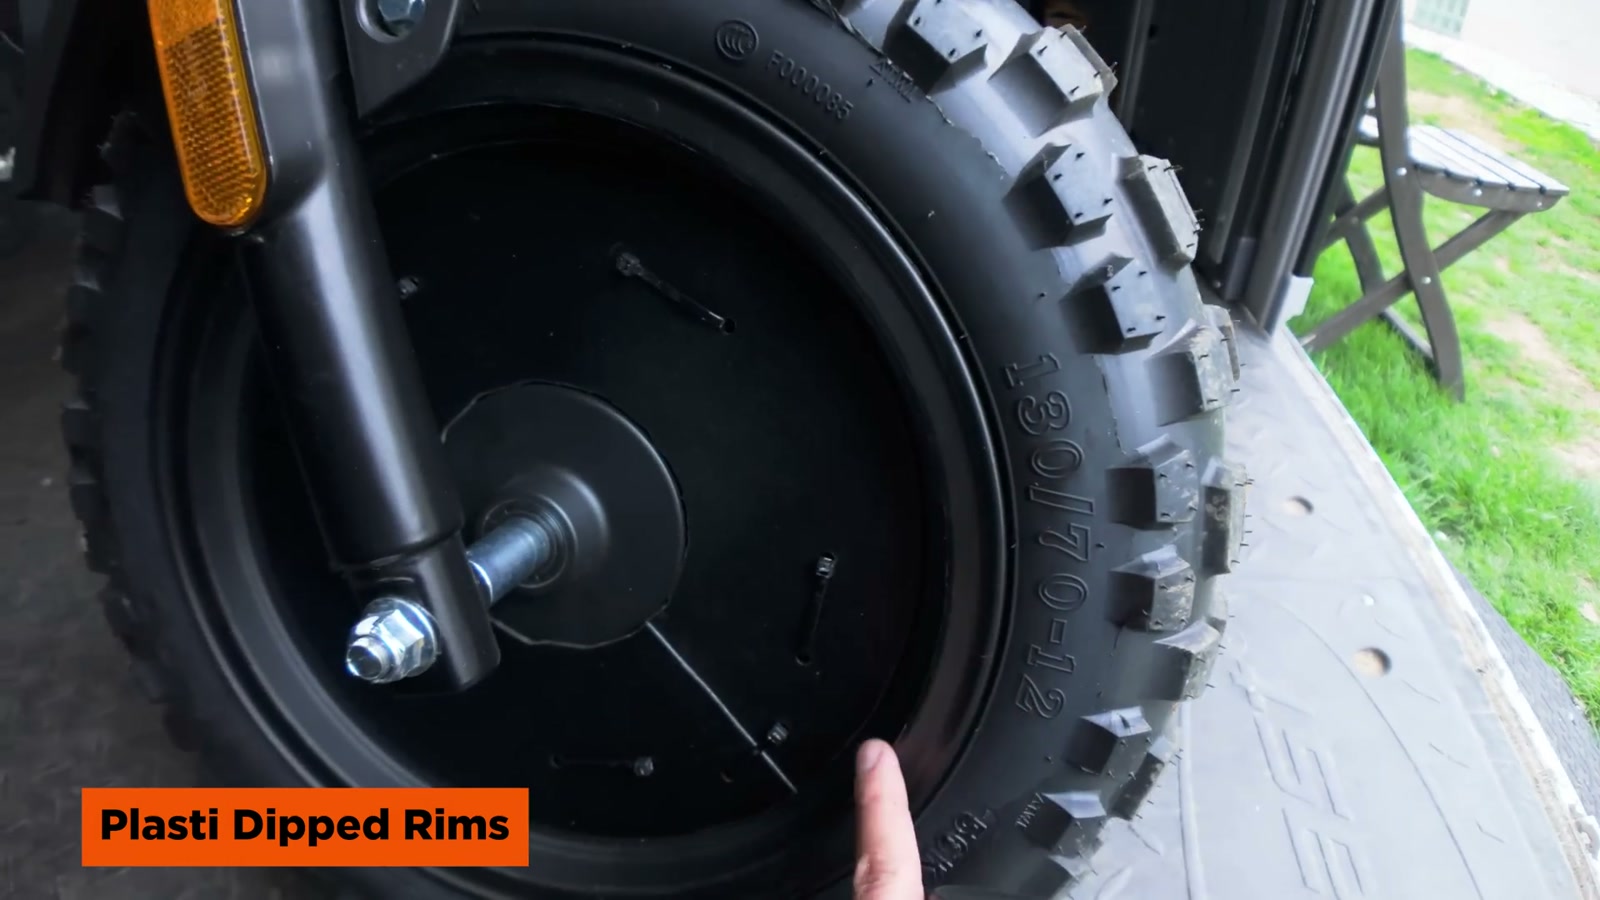
8) Plasti Dipped rims: removing the lime green without committing
To complete the blackout theme, I Plasti Dipped the lime green rim accents.
Process-wise it’s straightforward:
Tape the edges carefully
Cover components you don’t want sprayed
Spray multiple coats (I did six coats per side)
Wait about 30 minutes between coats
Let it cure overnight
The result looks great and, like the vinyl, it’s reversible—peel it off to return to stock.
9) Turn signals + lighting: visibility and street-legal vibes
This was the biggest functional upgrade.
I added:
Side LED strip lights
An additional rear tail light strip that includes turn signal function (I kept the stock tail light too)
Fork-mounted signal lights
A compact turn signal switch on the bars
A flasher relay under the seat
On the street, the side strips are the standout. At night, being visible from the side matters, and these make the bike look sharp while doing real work.
Powering the lighting: tapping the bike’s 12V
Under the seat there’s a step-down that provides 12V. I tapped into the 12V output and ran wiring to the front and rear to power the signal system.
Key detail: there are three wires coming out (black, yellow, red). The black is negative and the yellow is the 12V output. I stayed away from the red.
I routed wiring through the frame and out through a side panel. One of the nicest things about this mini bike is how easy it is to route and hide wiring because the chassis is compact and accessible.
Street legality (Michigan)
Where I live in Michigan, signals, a horn, and a mirror help cover key requirements to register as a moped. The bike already has a horn, and with the mirror and signals installed, it’s much closer to being street-ready.
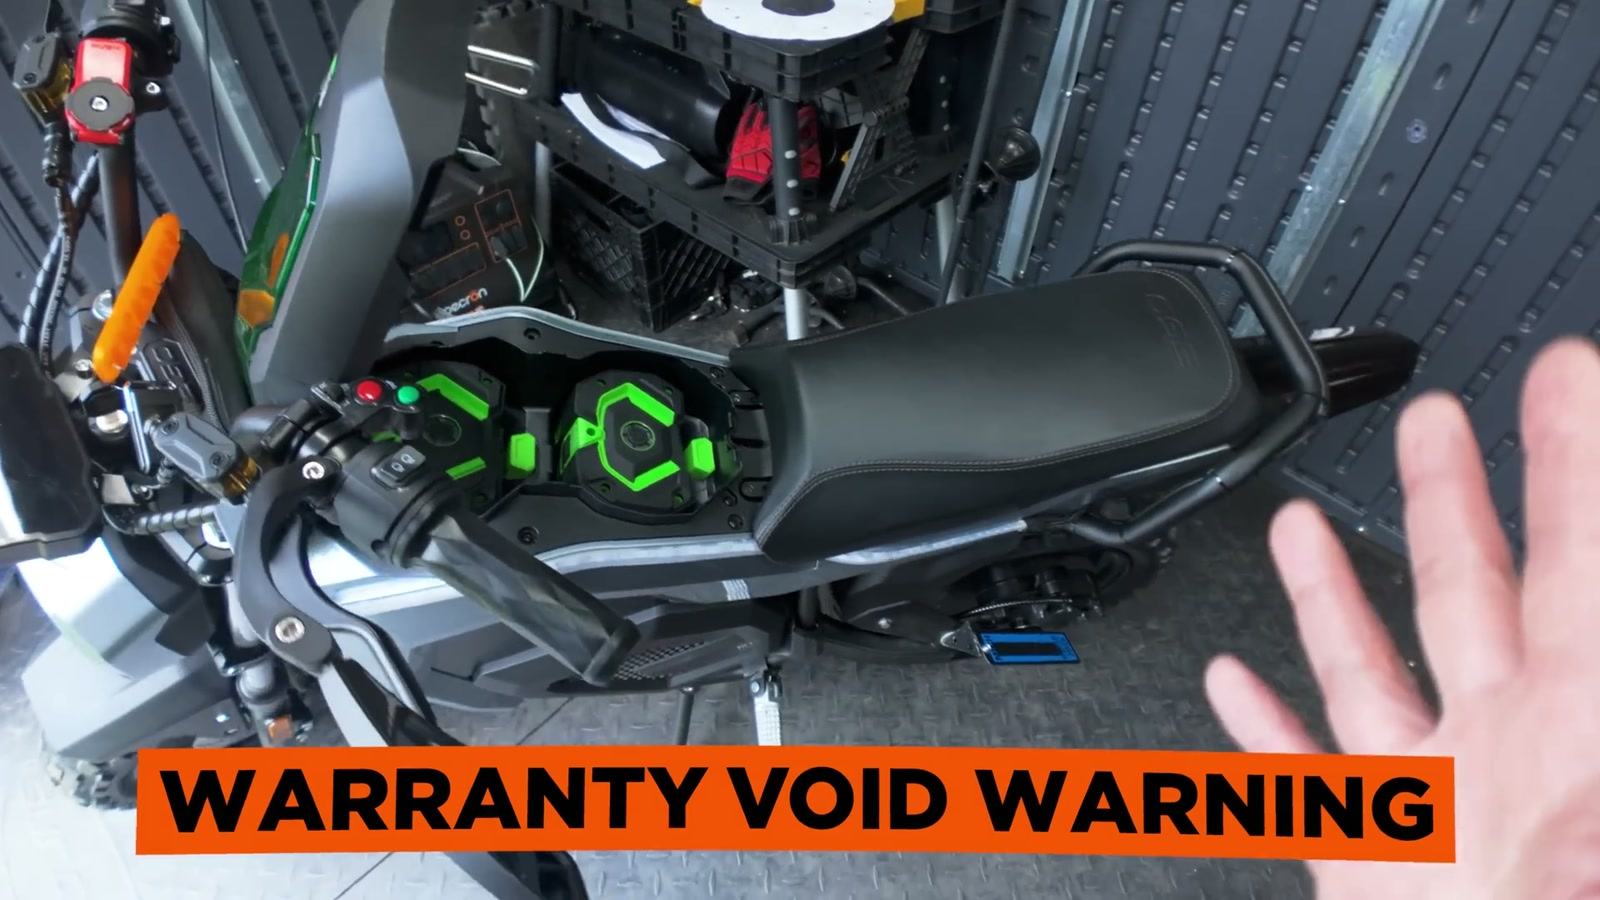
A quick warranty reality check
Any time you start tapping wiring and changing how systems behave, you should assume there’s potential warranty risk.
My understanding is that if a warranty claim can be linked to a mod, it can be denied. If it’s unrelated, you may be fine. The bike’s warranty window is one year from purchase, so keep that in mind before doing deeper electrical changes.
Next up: street tires for a mini supermoto vibe
I ordered Michelin City Grip 2 tires in the same size as stock (13x70-12), but in a street tread.
This should push the bike further toward that mini-Grom/mini-supermoto look and feel. I’m planning to get help mounting them because working around the rear hub motor and cabling is not something I wanted to wrestle with solo.
What We Like
Mirror adds immediate street confidence and safety
Extended fender cleans up the rear and improves the profile
Storage bag is genuinely useful day-to-day
Quad Lock mount stays solid and makes navigation easy
Brake cutoff tweak makes low-speed control smoother (and it’s reversible)
Vinyl + Plasti Dip blackout is reversible and dramatically changes the look
Turn signals and side lighting make the bike far more visible at night
The frame is easy to work on and route wiring through
Things To Consider
Electrical mods can create warranty headaches if an issue is linked to your changes
DIY lighting takes patience: wiring, routing, and keeping everything tidy matters
Some mods are purely aesthetic (disc cover) and won’t change performance
If you’re adding signals for legality, check your local requirements (they vary)
Final Thoughts
These are the mods that made my EGO Power+ Mini Bike feel like mine. None of them require turning the bike into a full custom build, but together they improve the ride experience in the real world—more utility, more control, and more confidence around cars.
If you’re new to the platform, I’d start with the mirror, storage, phone mount, and (if you’re comfortable) the visibility upgrades. Then worry about the cosmetic stuff once the bike fits your routine.
And if you’re the type who looks at this bike and thinks it’s “just a toy,” I don’t see it that way. The foundation is genuinely cool, easy to mod, and it feels like it’s only scratching the surface of what it can become.