
Onyx CTY2 Simple Mods + My Custom Kelly Controller Settings for a More Lively Ride
August 14, 2022
Some links in this article may be affiliate links. If you buy through them, we may earn a small commission at no extra cost to you.
The Onyx CTY2 is one of those EVs that’s fun stock, but it really comes alive once you start personalizing it. I wanted my CTY2 to feel a little more “mine” right away: cleaner front end, better nighttime presence, less visual clutter at the bars, and a punchier ride without going down a rabbit hole of major drivetrain upgrades.

These are the first simple mods I installed, plus the controller settings I’ve been running for a noticeable performance bump while still keeping the bike feeling smooth and manageable.
Lighting That Looks Right (and Actually Helps)
LED light bar swap
I like the stock headlight, but the light bar instantly gave the CTY2 a more futuristic look that fits the lines of the bike better. What I really loved is how painless the mounting was: I reused the stock Onyx brackets, and the hardware from the light bar fit right in without me needing to fabricate anything.
Wiring was straightforward. Inside the battery case, the headlight wiring is easy to trace. I used spade crimp connectors, put them on the light bar leads, and plugged directly into the CTY2 wiring.
A couple wiring notes from my install:
Black is negative
Green is positive
Yellow is for high beam (my light bar didn’t use it, so I left it disconnected)
No wire extensions, no drama. It routes through the frame cleanly.
This is one of my favorite “low effort, high payoff” touches. I went with a thin USB LED strip that’s basically plug-and-play. The cable was long enough to reach the USB port without tapping into the bike’s internal wiring.
I routed it along the left side, tucked it underneath the frame, then around to the right side and up. I trimmed it so both sides looked even and flush.
At night, it’s seriously bright. And because the USB port is fixed, I can still charge my phone or run other small accessories without it feeling like I’m doing something sketchy.
A Cleaner Cockpit: Swept-Back Display
This is a subtle mod, but it changes how the whole bike presents itself.
The display originally sat farther forward and visually hung out over the headlight area. After swapping the headlight, that space felt more open, and the display sticking out became more noticeable.
I used the brackets that came with the headlight to remount the display back toward the center of the bars. The result is a cleaner profile that feels more tucked-in and intentional—almost more aerodynamic-looking, even if that’s mostly aesthetic.
Fenders: Practical, Good-Looking, and Easy
Magnetic front fender
Like my Onyx RCR setup, I added a David Shaw magnetic front fender with strong earth magnets. It’s a simple way to get fender coverage without making the front end look bulky.

Surron rear fender adaptation
For the rear, I used a Surron rear fender. It surprised me how natural it looks on the CTY2—like it belongs there.
Mounting was simple:
I drilled two holes in the fender
Used long skateboard bolts
Mounted it to the bottom of the frame using the existing mounting points
This is the kind of mod that feels “DIY” in the best way: inexpensive, effective, and it cleans up the rear of the bike a lot.
Cosmetic Details That Change the Whole Vibe
Because the CTY2 already has that clean white rim, white spoke covers lean into the look and make the wheels pop more. It’s purely visual, but it ties the whole bike together—especially if you like that bright, clean contrast.
Seat Swap: More Step-Through, More Style
This seat is a replica of classic vintage moped seats, and it fits the CTY2’s vibe really well. The shorter length makes the step-through feel more accessible, and visually it gives the bike a cleaner, more aggressive silhouette.
Install note: the seat mounting points were slightly too narrow for the frame brackets on my bike. The fix was simple—just spread the bolts a bit (a mallet did the job) and then it pushed right on.
Rear Shocks: A Small Improvement That Grows on You
EgoBoost adjustable rear shocks
I installed adjustable EgoBoost shocks and set them as soft as possible since I’m not that heavy. Right after installation, I didn’t feel a huge difference compared to stock.
But after more riding, once they had some time to break in, I started noticing them working a bit more. It’s not turning the CTY2 into an off-road bike (and it’s not going to feel like a Surron), but it is a slight improvement over stock and the adjustability is nice to have.
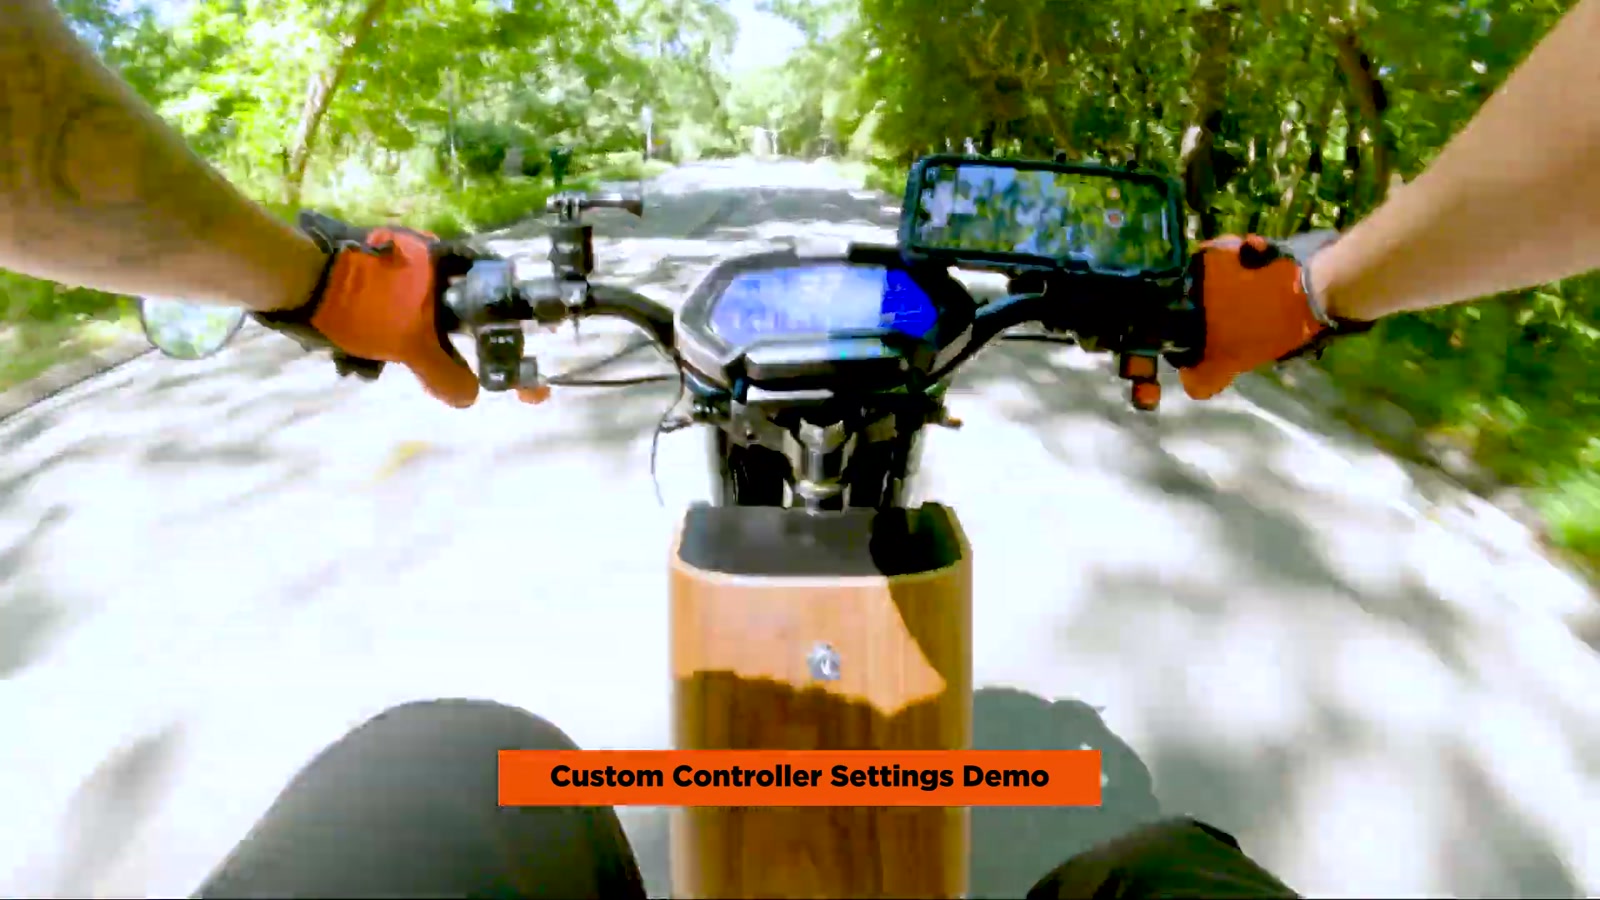
Custom Kelly Controller Settings: The CTY2 Feels “Unlocked”
This is the mod that most changed how the bike feels day to day.
I used the Kelly Controller app to adjust settings for stronger torque and quicker acceleration while keeping throttle response smooth and predictable. I also disabled the full-time active regen behavior in sport mode, which gave me a proper freewheeling feel when I roll off the throttle.
The real-world result
Acceleration became noticeably more lively
The bike reached speed much faster
Throttle stayed smooth, just delivered sooner
Letting off the throttle in sport mode felt natural (freewheel instead of regen drag)
It didn’t feel like it suddenly became a different class of machine—it still rides like a CTY2—but it felt more “awake.” For me, this was the sweet spot: more punch without feeling like the bike is trying to wheelie out from under me.
One thing I noticed when testing the different ride modes: once you exceed the speed cap in eco/normal, rolling back into the throttle can feel a bit like it’s pulling you back down to the limit. It’s a slightly strange sensation at first, but it makes sense once you understand the modes are actively trying to keep you under their caps.
A quick word on risk
Changing controller settings is always at-your-own-risk territory. The app makes it easy to connect and adjust values, but you can absolutely get yourself into trouble if you don’t understand what you’re changing. The settings below worked well for me on a stock CTY2 without cutoffs during testing.
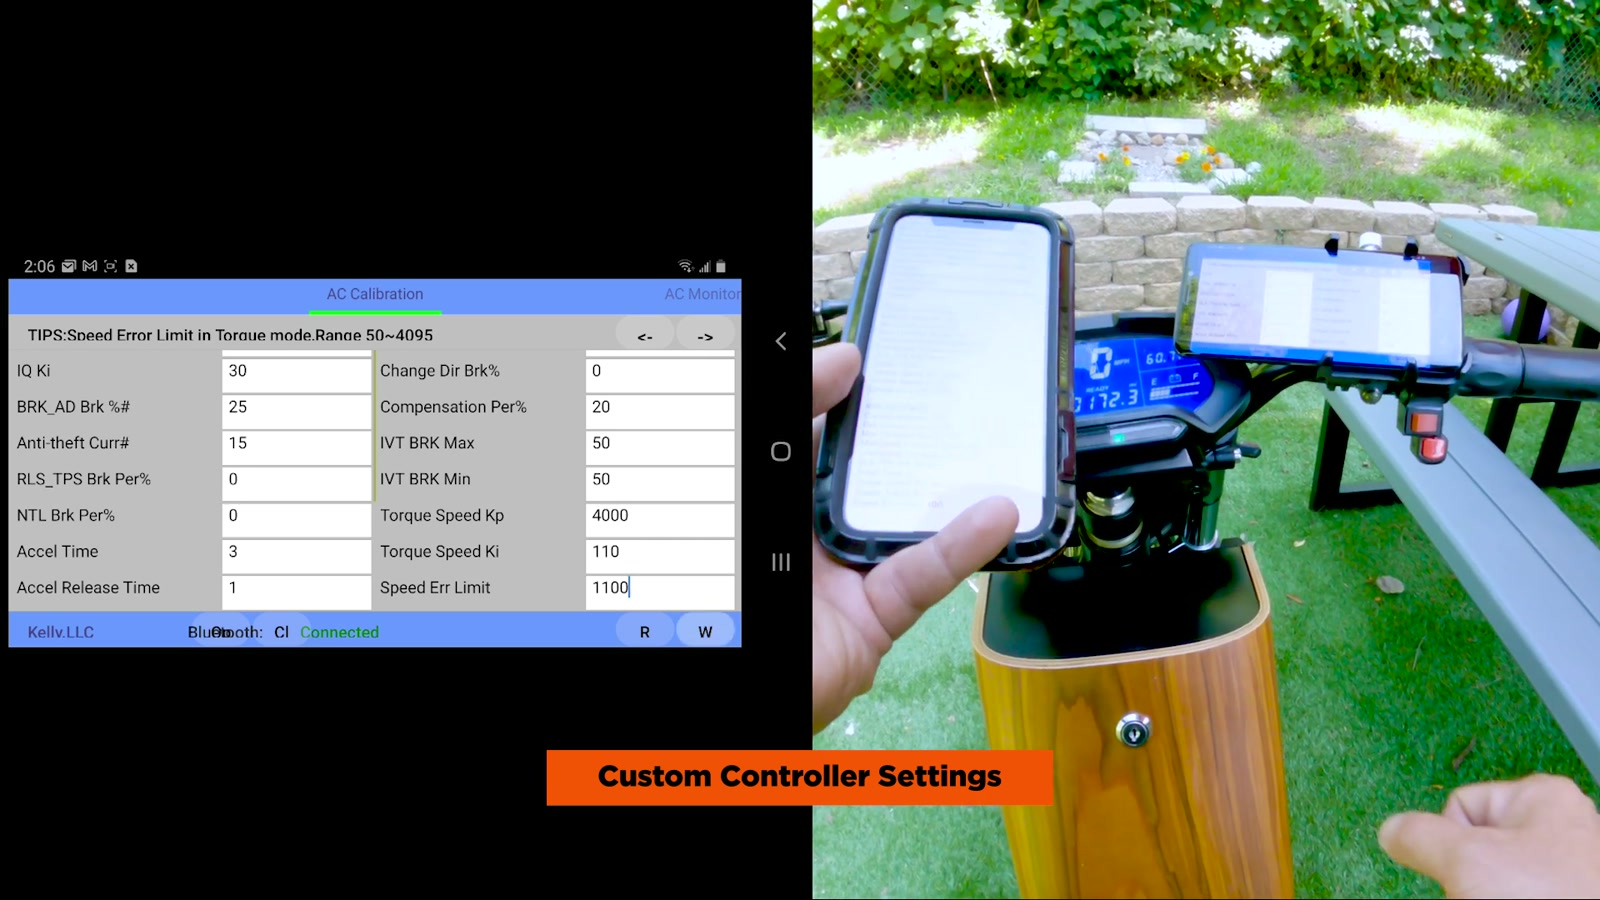
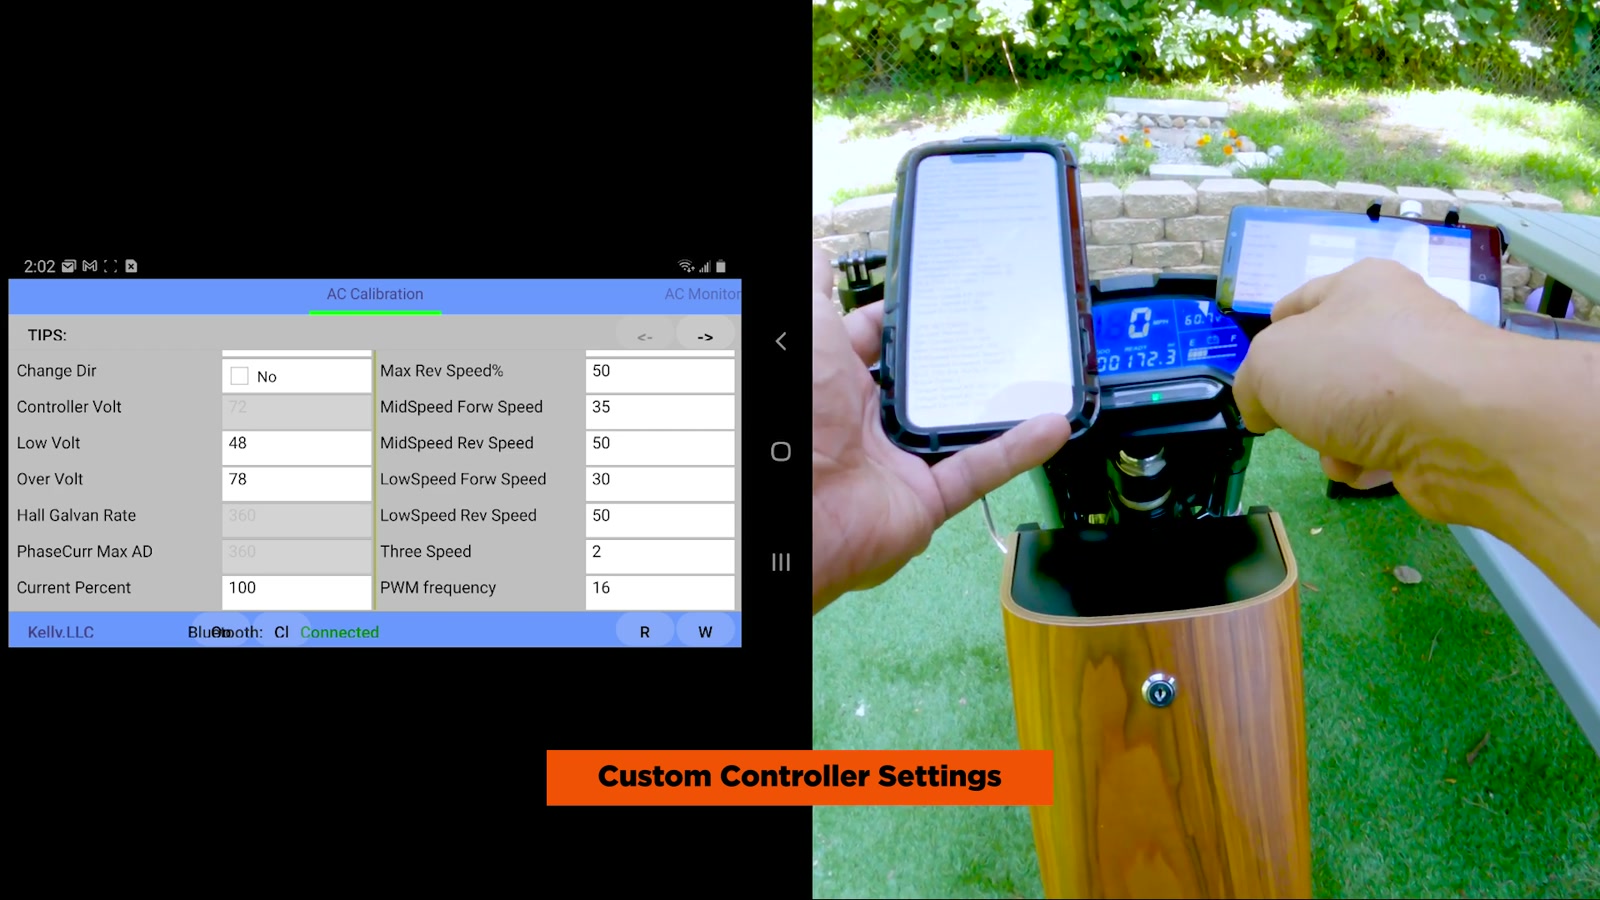
My CTY2 Kelly Controller Settings
Current Percent: 100
Bat Current Limit: 100
Max Forward Speed: 100
MidSpeed Forward Speed: 75
LowSpeed Forward Speed: 30
RLS_TPS Brk Per%: 0
Accel Time: 3
Torque Speed KP: 4000
Torque Speed KI: 110
Speed Err Limit: 1100
What We Like
The light bar swap looks cleaner than stock and mounts using existing brackets
Easy wiring with spade connectors and no need to extend cables
The USB LED strip is bright, simple, and actually useful at night
Moving the display back cleans up the front end a lot
The CTY2 takes small cosmetic mods really well without looking overdone
Controller tuning made the biggest difference: faster, smoother punch and better freewheeling feel
Things To Consider
Controller tuning is at your own risk; changing the wrong value can cause problems
Eco/normal speed limiting can feel a little odd when you’re over the cap and roll back on throttle
The mini racer seat may require minor fitment tweaks (bolt spacing)
Adjustable shocks aren’t a night-and-day transformation, but they do improve with break-in
A lot of these mods are simple by design; if you want “pro level” upgrades, you may want purpose-built kits/harnesses
Final Thoughts
The CTY2’s affordability and modding potential are a big part of why it’s getting so popular, and after living with it for a while I get it. It already has a classic look, and it doesn’t need much to start turning heads—especially with that mahogany battery cover that people immediately notice.
If I had to pick the most impactful changes from this batch, it’s the controller settings for ride feel, and the lighting for everyday usability and style. Together, they made my CTY2 feel more responsive, more dialed, and more personal—without turning the project into a full teardown.